
SSR - SSG - ISR - CSR in Next.js - The Ultimate Guide
Aug 2, 2022
-20 min read


Are you a React lover? If you ask me, of course, I am a die-hard fan. Performance boost,
, and Components-based architecture were the major factors that convinced me to choose React.js over other awesome JavaScript frameworks in the market, like Angular and Vue. Without a doubt, the main reason users go for React is the performance boost it gives against traditional technologies. Without a debate, ReactJs is an awesome library that gives us a massive performance boost using vDOM and unlocking something called Client Side Rendering(CSR).You might also have heard of
, of course. Next.js is basically the hottest React.js framework in the market right now. And my personal favorite as well. If you are coding in React for some time now, I bet you have heard of it and some lucky fellows might have tried it as well. Please let me know your experience in the comments section after reading this guide.Well, guys at Next.js claim that;
The React Framework for Production!
Next.js gives you the best developer experience with all the features you need for production: hybrid static & server rendering, TypeScript support, smart bundling, route pre-fetching, and more. No config needed.
After reading the above statement, a lot of questions arise in our minds, if nothing came to your mind, I am really sorry 😉.
Questions like;
Is NextJs better than Vanilla React?
What does NextJs provides us, which ReactJs don't or can't?
If React is a beast performance considering performance, why do we actually need NextJs?
You will get all of your answers in this guide. Just stay with me. We will answer these questions one by one.
Is NextJs better than React?
Without a debate, NextJs has a significant edge over React in production. One of the reasons is obvious that it is an extension, a sort of wrapper of React. NextJs provides us with all the features of React and in addition unlocking some major features like Server Side Rendering(SSR), built-in API routes, automatic Code Splitting, assets optimization(fonts, images, etc.), pre-rendering, and much more.
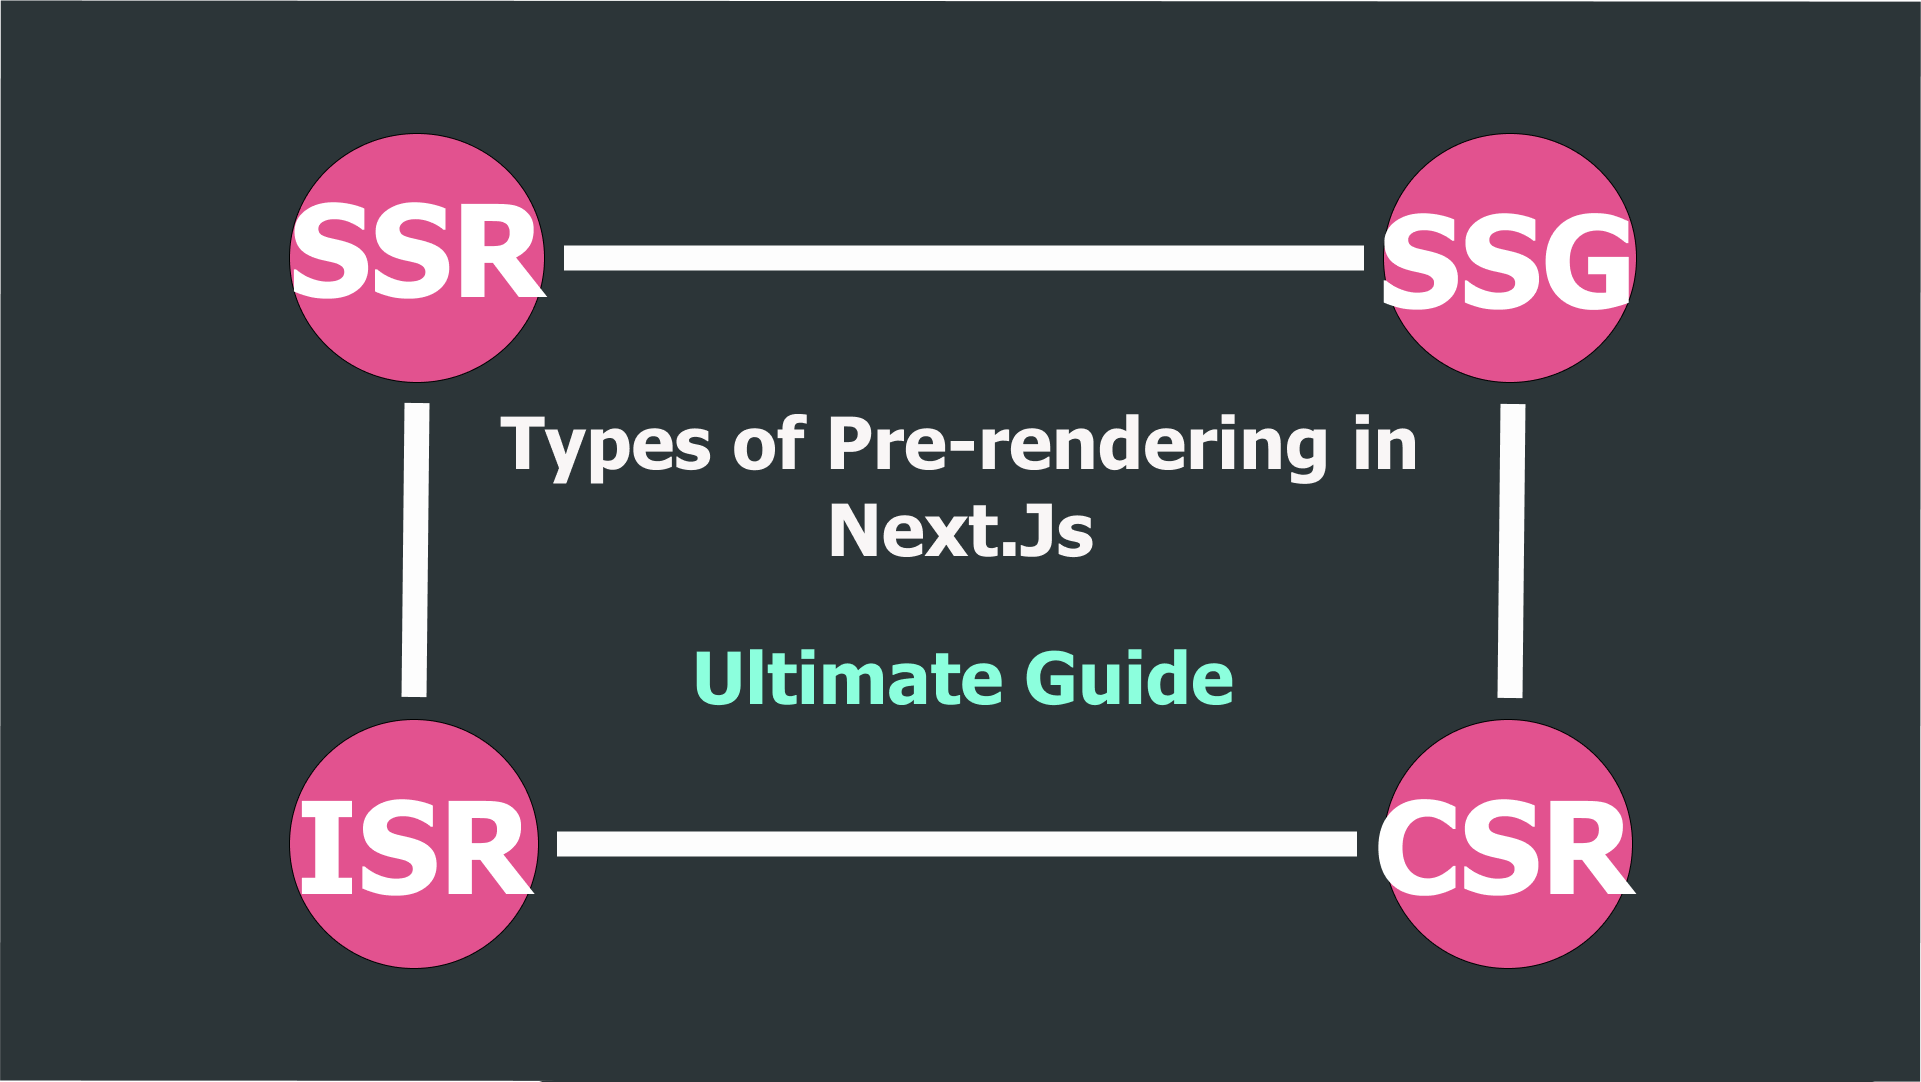
The main focus of our today's tutorial would be pre-rendering in NextJs, different ways of pre-rendering, like Static Site Generation(SSG), Server Side Rendering(SSR), and something really cool, Incremental Static Regeneration(ISR).
ISR is basically an advanced version of SSG, which we can use to tackle stale(outdated) data problems in SSG. We will discuss automatic ISR as well as how we can manually trigger revalidation.
What does NextJs provides us, that ReactJs do not or can not?
As we have already discussed, NextJs provides us with all the features of React and in addition unlocking some major features like Server Side Rendering, built-in API routes, automatic Code Splitting, assets optimization, pre-rendering, Internationalization, and much more. For a complete reference, do visit the Next.js
.If React is a beast, why do we need NextJs?
Well, this important question needs to be answered in detail. We need to know how React.js works, and what improvements Next.js does bring to the table.
Working of React
Before React, some smart minds at Facebook noticed that JavaScript was pretty fast but DOM manipulations were slowing everything down. DOM is basically an object-based representation of the Web page we are viewing. DOM is a set of nodes, every node refers to a particular element on the webpage. In short, DOM is a tree-like object-based representation of a document, which contains information about a particular element, styles associated with that element, the geometry of that element in the document, etc.
Before React, when we needed to change something in a webpage (DOM - behind the scenes), the whole webpage was recreated. This was very unintelligent and expensive. So programmers at Facebook came up with a smart(actually genius) way of manipulating DOM.
The problem was a recreation of the whole DOM when the small change was to be reflected on the webpage.
And the solution React.js brought was intelligent monitoring of the actual dom in form of virtual DOM(vDOM), and only updating necessary portions of the actual DOM in the best way possible.
This gave a massive performance boost compared to traditional DOM manipulation techniques as well as modern React competitors like Angular and Vue.
Client Side Rendering (CSR)?
React.js also unlocks Client Side Rendering. Let me explain What CSR is? And how React.js uses CSR to provide us with performant applications. When a user visits an application built with React, following processes occur behind the scenes;
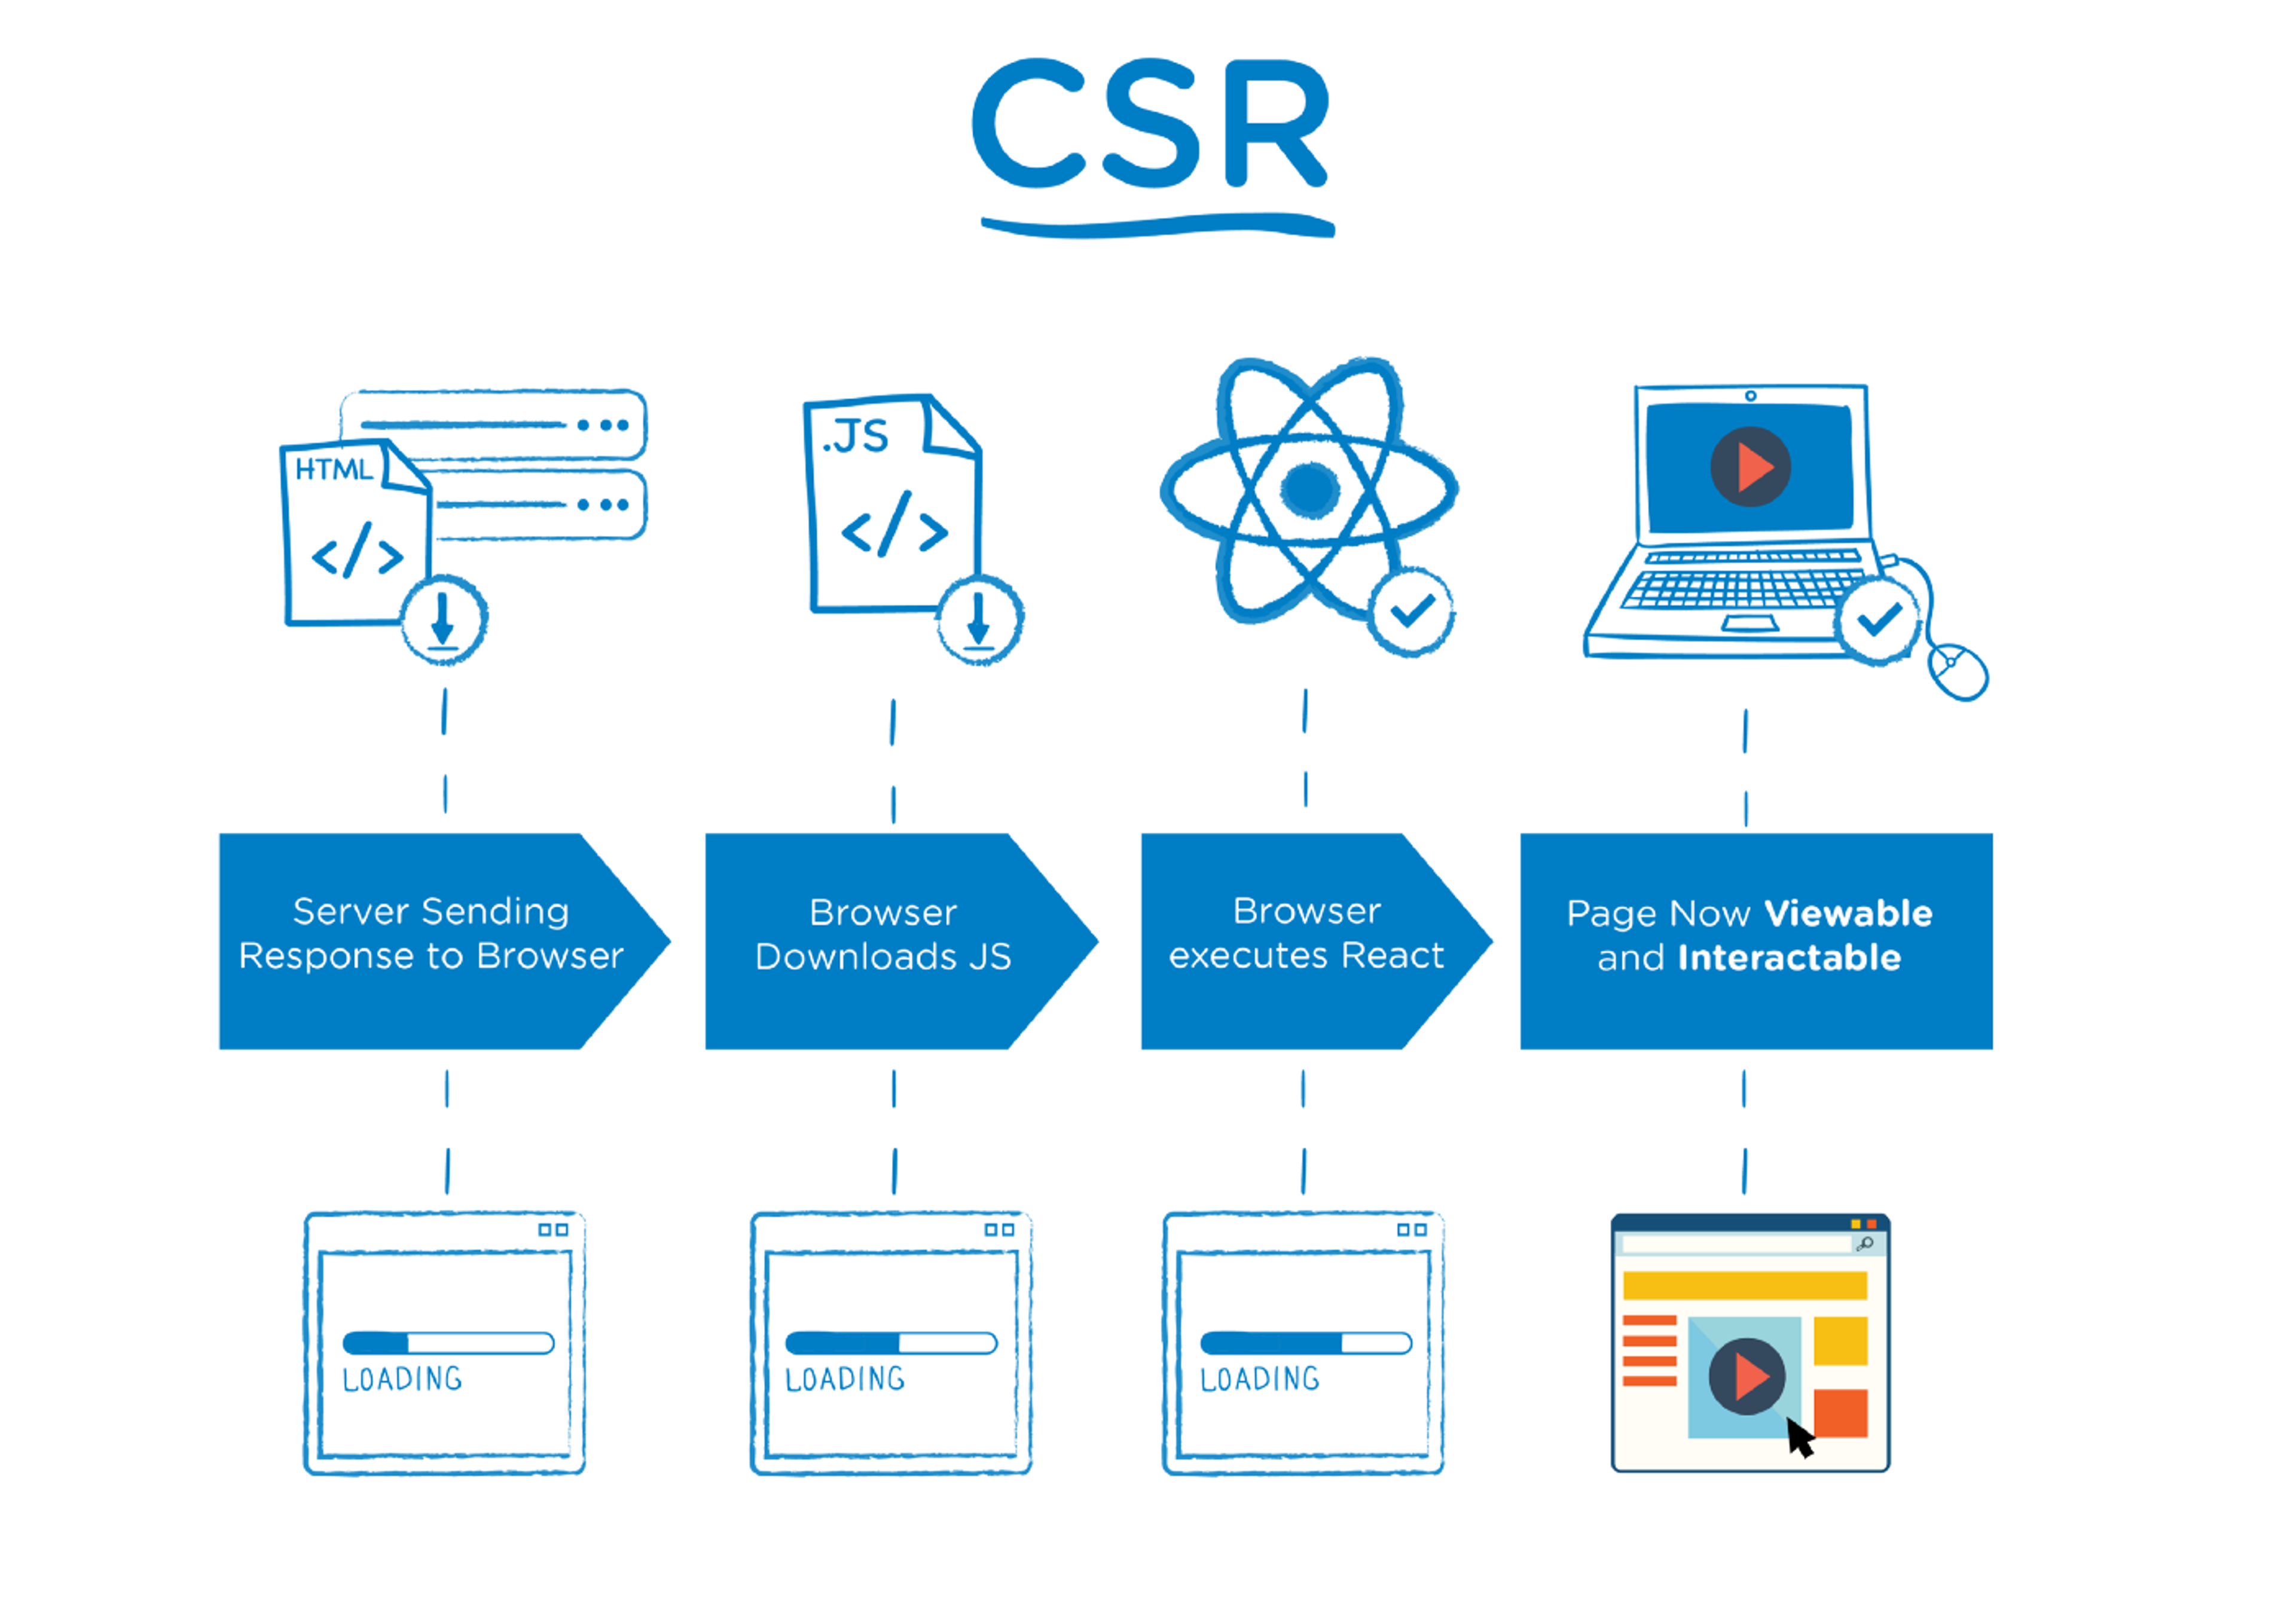
Step1: Almost empty response is sent to the client(browser), which is a minimal HTML document. This document has nothing in it except links to the JavaScript chunks sitting on the server. There is a little blink of emptiness before the web page is fully visible because there is nothing to render, but an almost empty HTML document.
Step2: In the second step, the JavaScript bundle is downloaded from the server. Usually, a complete application bundle is downloaded unless manual code splitting(
) is implemented.Step3: Browser executes JavaScript (React), and renders(
) content to the screen. Populates empty HTML document containing root node. At this point, our page is completely visible and interactive.On the other hand, Next.js does these things a little differently. Here is how.
Working of Next.js (SSR)
Next.js unlocks Server Side Rendering (SSR) for our applications. In vanilla React.js we can implement SSR components as well using something called
, but it requires a little extra configuration.In Next.js(SSR), a request is sent to the server for a specific page, instead of sending the whole JavaScript bundle to the client, the server itself takes responsibility of rendering the page for us.
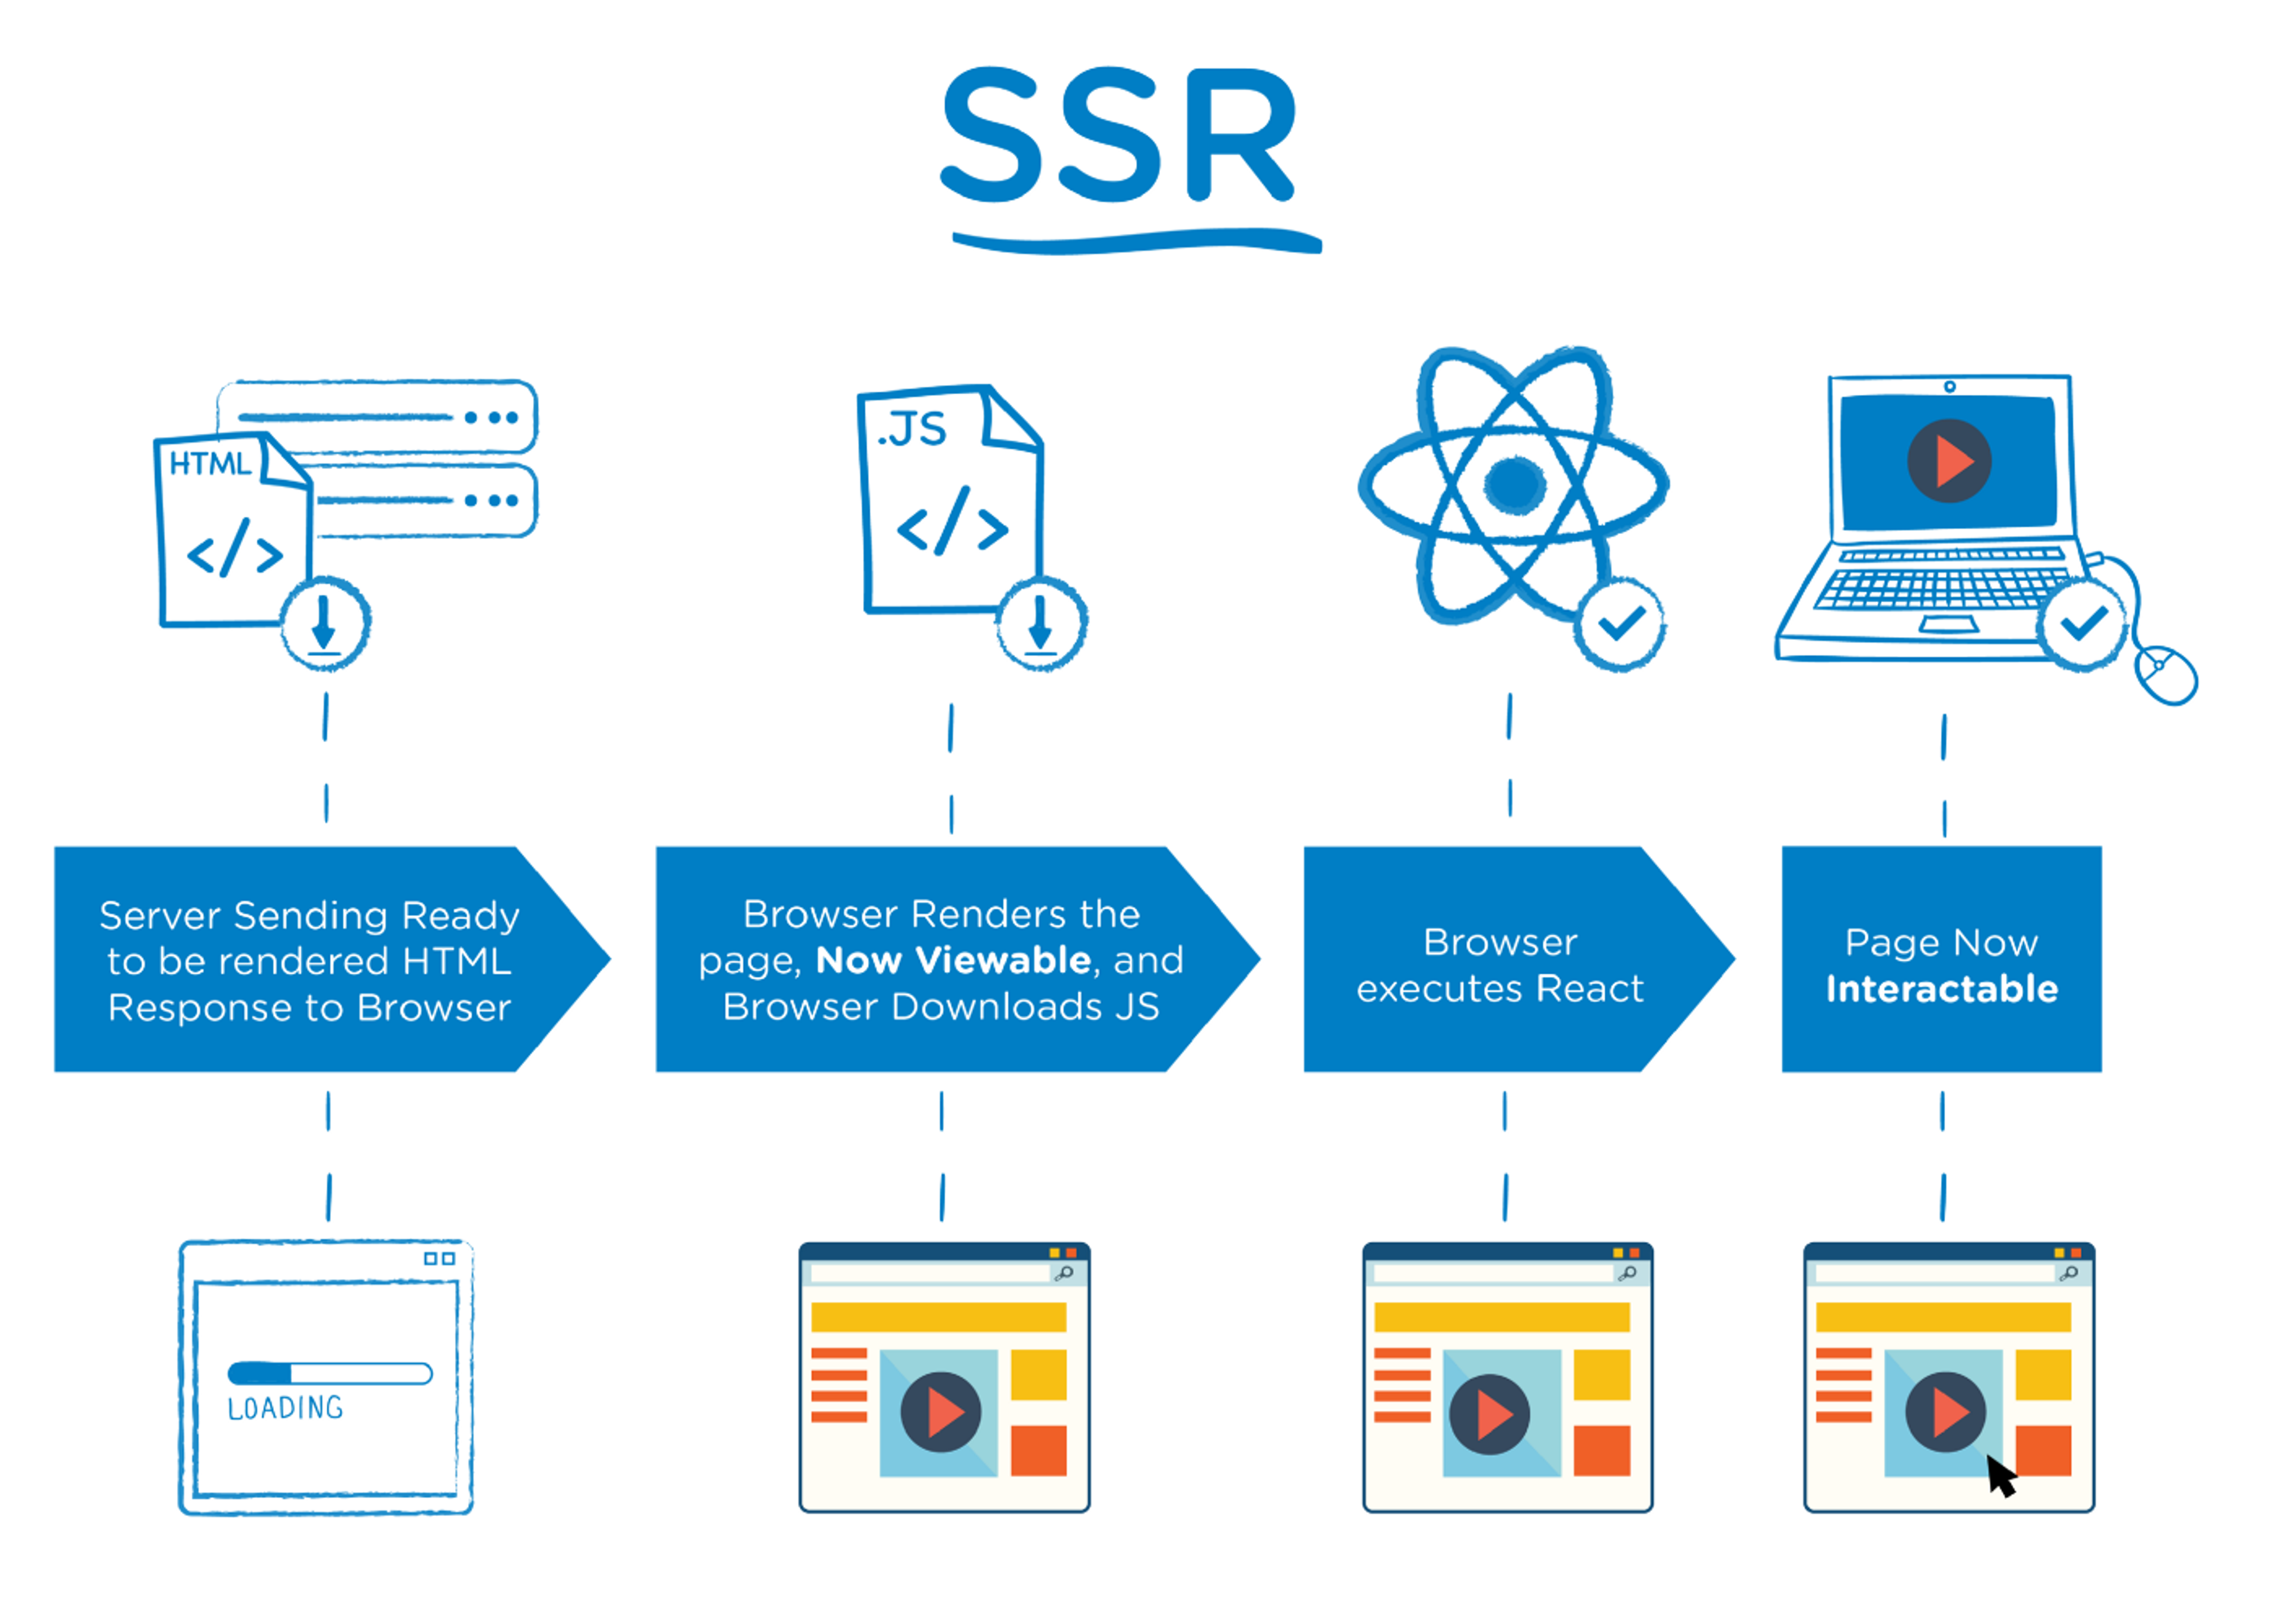
Step1: First of all after the request hits the server from the client, it starts building an HTML document for us. These powerful servers with extremely fast internet (for instance
) can do this task in milliseconds.Step2: Freshly generated HTML page is sent back to the browser with some associated JavaScript necessary for the page. The browser takes the HTML document and displays it for us. At this point, the page is completely visible to the user. But unfortunately, users cannot interact with it. But here is another catch. This phase of numbness does not last any longer than a few milliseconds.
Step3: Then comes the hydration part, the browser downloads JavaScript from the server, and now Page is interactive as well.
Difference
- Page is visible faster in the case of Next.js than React.
- There is a little blink in the case of React because an almost empty document is received by the browser at first. While in the case of Next.js fully rendered HTML document is sent to the browser, so no blink.
- Server resource utilization is usually high in the case of Next.js because the server is the one doing all of the heavy duty.
- Overall performance is high in the case of Next.js because only necessary stuff(automatic code splitting) is downloaded from the server instead of the complete application bundle as in React. Readymade page is sent, ready to render the page is sent to the browser.
As it is evident now, Nextjs has an edge over React js in almost every aspect. So it is not even a debate. Enough of the comparisons, let's focus on our main topic for today.
What is pre-rendering?
Next.js pre-renders every single page by default on the server. When a user requests a page from the server, a page is freshly built(SSR) on the server or the page is already sitting on a server(SSG), ready to be delivered to the browser. We will discuss all the possible scenarios. This technique adopted by Next.js, to send ready-made, ready-to-render pages to the browser when requested is called pre-rendering.
If you visit Next.js pages documentation, you will learn that Next.js pre-renders every page, by default.
By default, Next.js pre-renders every page. This means that Next.js generates HTML for each page in advance, instead of having it all done by client-side JavaScript. Pre-rendering can result in better performance and SEO.
Next.js don't believe in Client Side Rendering, which puts everything on the user's CPU and internet to make our application run. Instead, Next.js handles rendering Server side. Next.js pre-renders(pre-builds) every page in advance before it is sent to the browser(SSR), or even before the page is requested by the user(SSG).
Next.js generates HTML documents for every page on the server in advance, associated with minimal JavaScript necessary for the page. Our web page is completely available to the browser as well as search engine crawlers. Which in turn gives us better SEO scores and performance.
We need to address some questions that might have already popped into your head. Questions like;
How does Next.js handle pre-rendering pages?
What types of pre-rendering are there in Next.js?
When to use, what type of pre-rendering?
How does Next.js handle pre-rendering pages?
NextJs pre-renders every page by default. When we bootstrap the Next.js app, we get /pages directory. Any file inside the pages directory is mapped as a page if it default exports a function.
Create Next App
Let's create an empty Next.js app using create-next-app, so you can also follow along. Open your terminal, and run the following command;
npx create-next-app@latest <app-name>
Or with yarn
yarn create next-app <app-name>
Do not get confused by npx here, as npm and npx are two separate things.
is a package manager for . While is a package by npm, it can be used to run npm package binaries.After finished, open the directory in the code editor, and spin up the app in the dev environment by running npm run dev or yarn dev.
Our main focus will be on the pages directory, so open it. You will see:
/pages/api: Next.js provides us a way to build API routes from within our Next.js app in the form of serverless functions. As Next.js is using Node.js behind the scenes. We will discuss this in a while.
_app.js: This is pretty much the starting point of every page inside the page's directory. You can think of it as a wrapper for every page.
index.js: This file represents the homepage of our application, which users will see the visiting the root of our application, let's say,
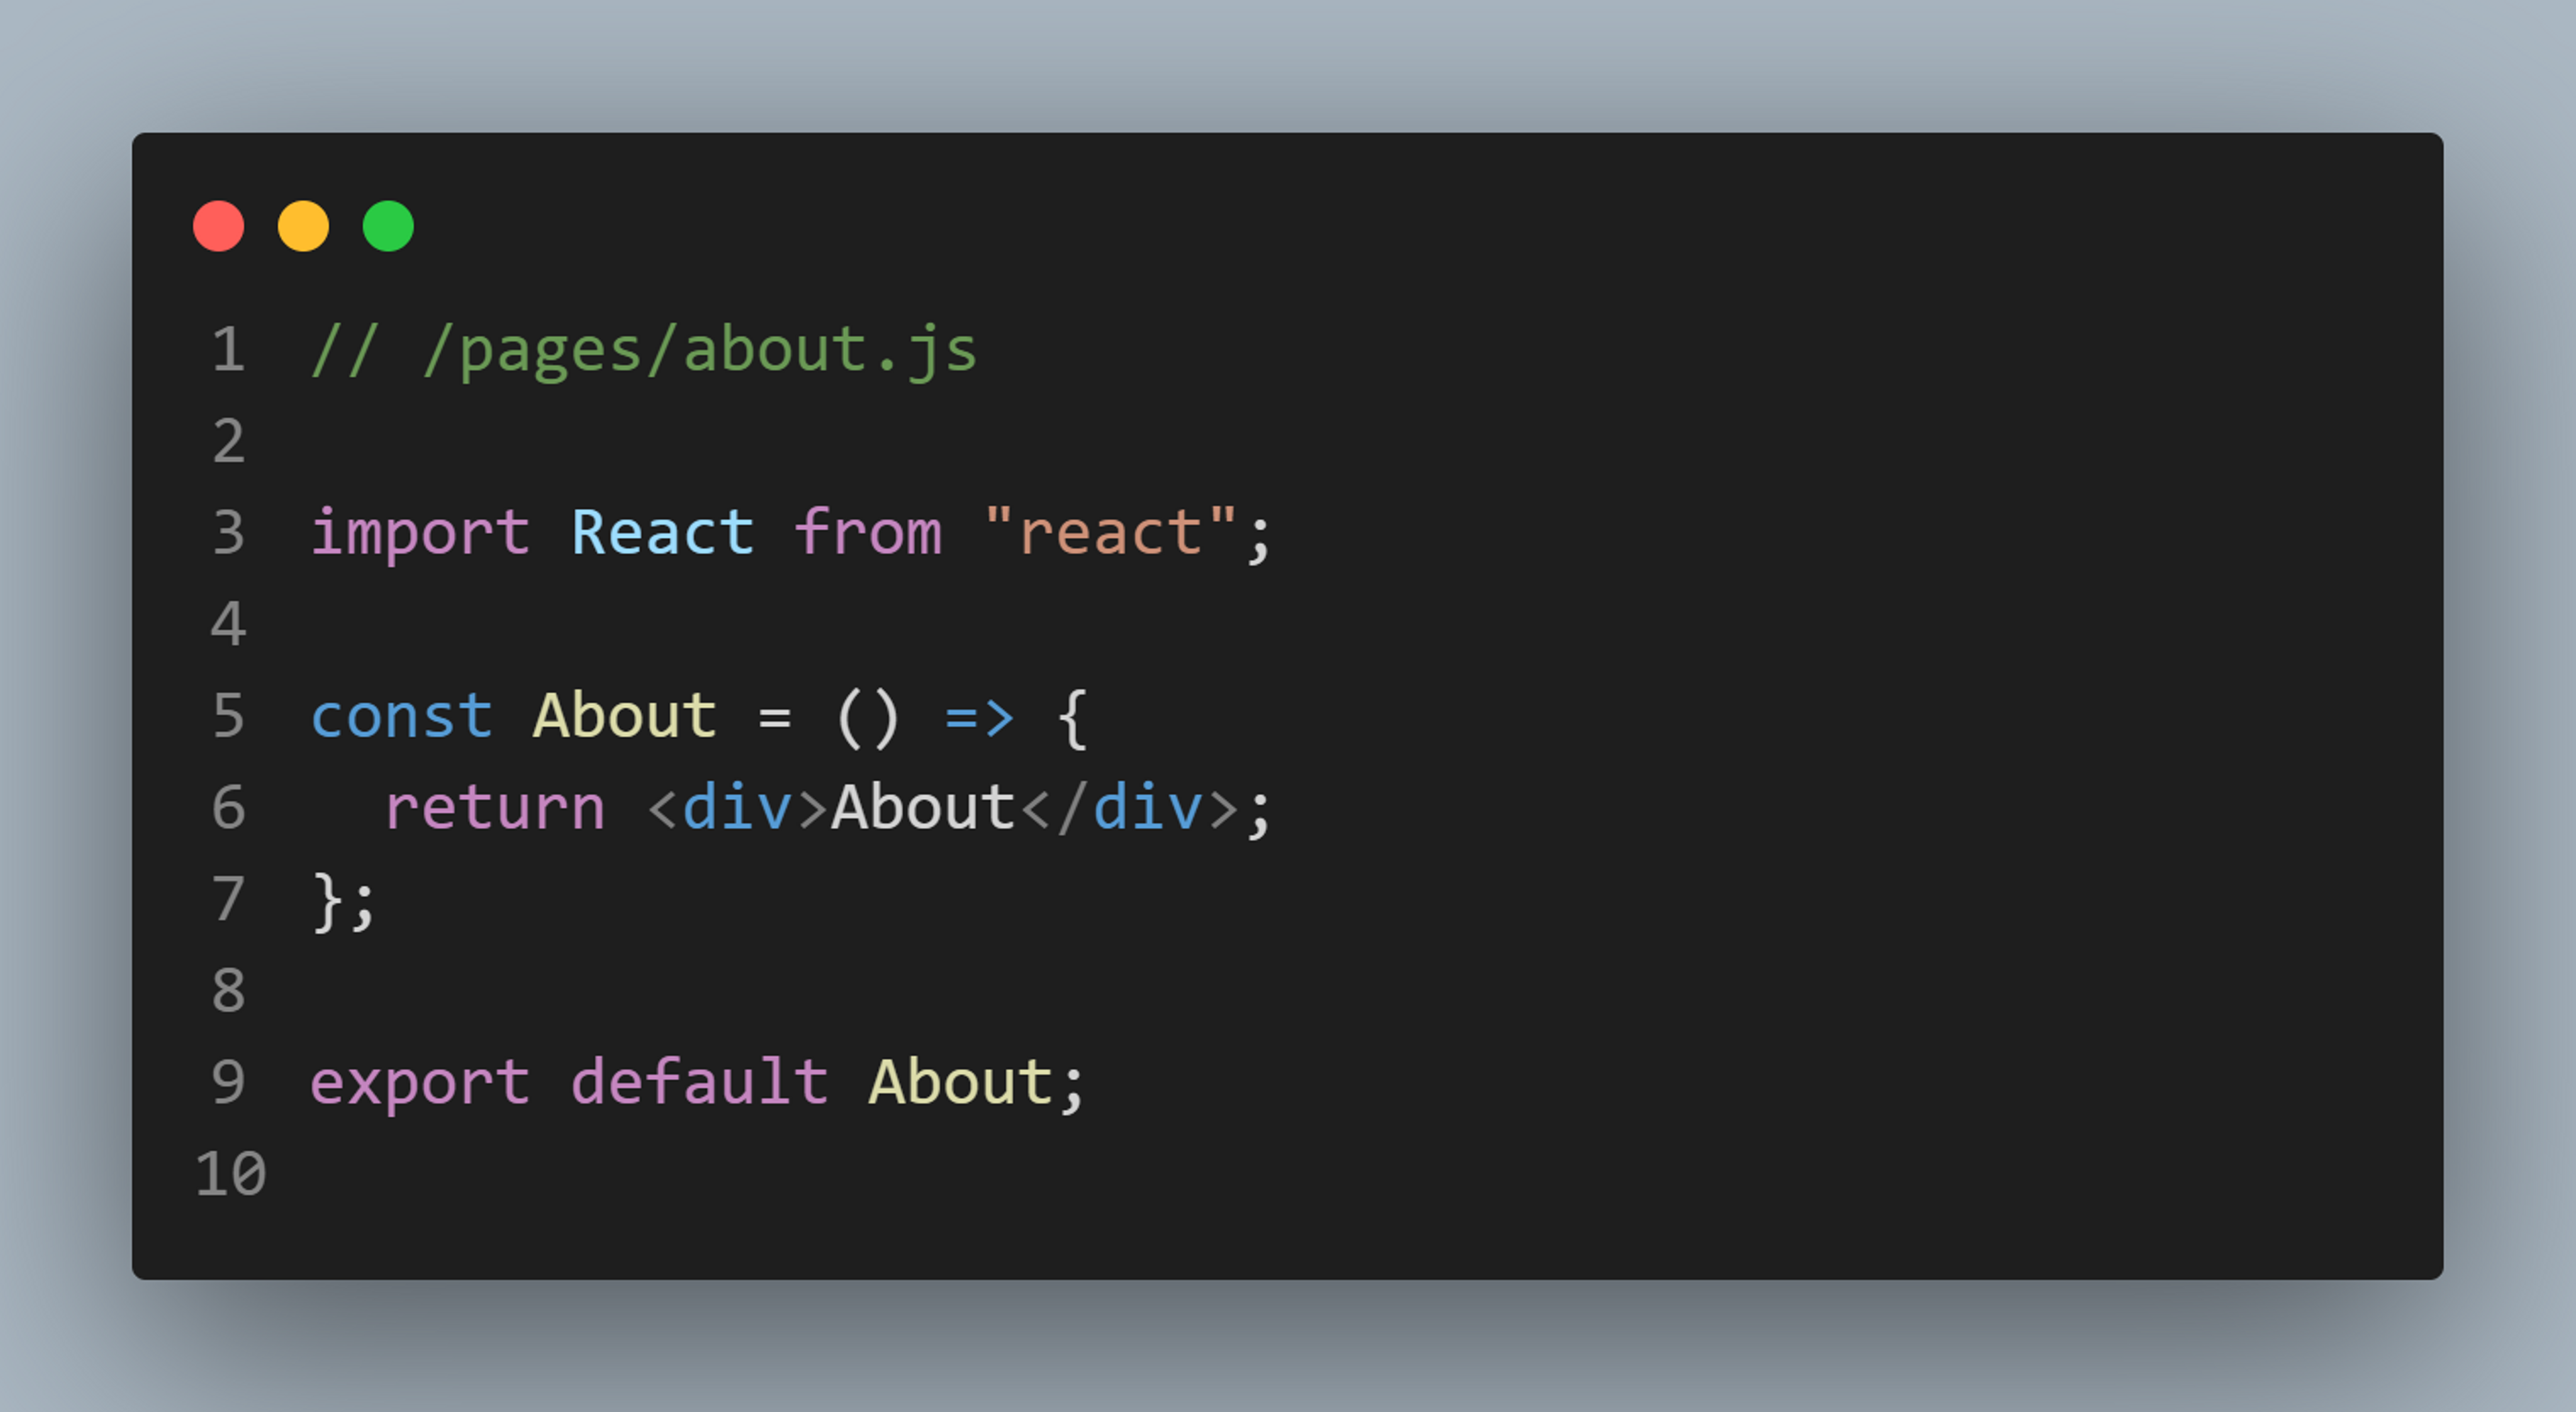
Well, we can add new pages inside our application by simply default exporting a component from a file inside the pages directory. Let's say we want to create an about page for our application, simply add about.js inside the /pages directory. Now you can visit your page at localhost:3000/about.
What types of pre-rendering are there in Next.js?
As we already know Next.js builds every page in advance before it is sent to the browser. But we can categorize pre-rendering on the base of the time when the page(HTML document) is built on the server.
Next.js supports two kinds of pre-rendering at the moment. But we can leverage it to three as follows;
- Server Side Rendering(SSR)
- Static Site Generation(SSG)
- Incremental Static Regeneration(ISR) - SSG extension
Server Side Rendering?
If a page is being generated again and again on every request, then it is Server Side Rendering. SSR is a great option for applications that need to update the UI more frequently, like stock listing applications. The user comes to the page, the request is sent to the server. The server generates a fresh copy of the Webpage(HTML document) and sends it to the client with minimal JavaScript associated with it.
After the page has been painted(displayed) by the browser, the browser downloads JavaScript and makes the our page interactive. This is called hydration. I will not discuss hydration in detail here, but Hydration is basically a process when our browser downloads JavaScript from the server, and the page becomes interactive. You can learn about it more in this
.How to implement SSR in Next.js?
Well, another plus point of Next.js is that it gives you complete control over your application and does not bind you to use SSR or SSG for your entire application. You are free to choose SSR or SSG for individual pages. Or even you can use SSR or SSG on some portion of your page and then use Client Side Rendering(CSR) at runtime to handle the rest of the page. We will discuss these use cases in a while. For now, let's see how we can enable SSR for any page in Next.js.
Consider this home page, fetching and listing fresh stock quotes every time this page is requested;
Step1: Replace the content of the homepage /pages/index.js as;
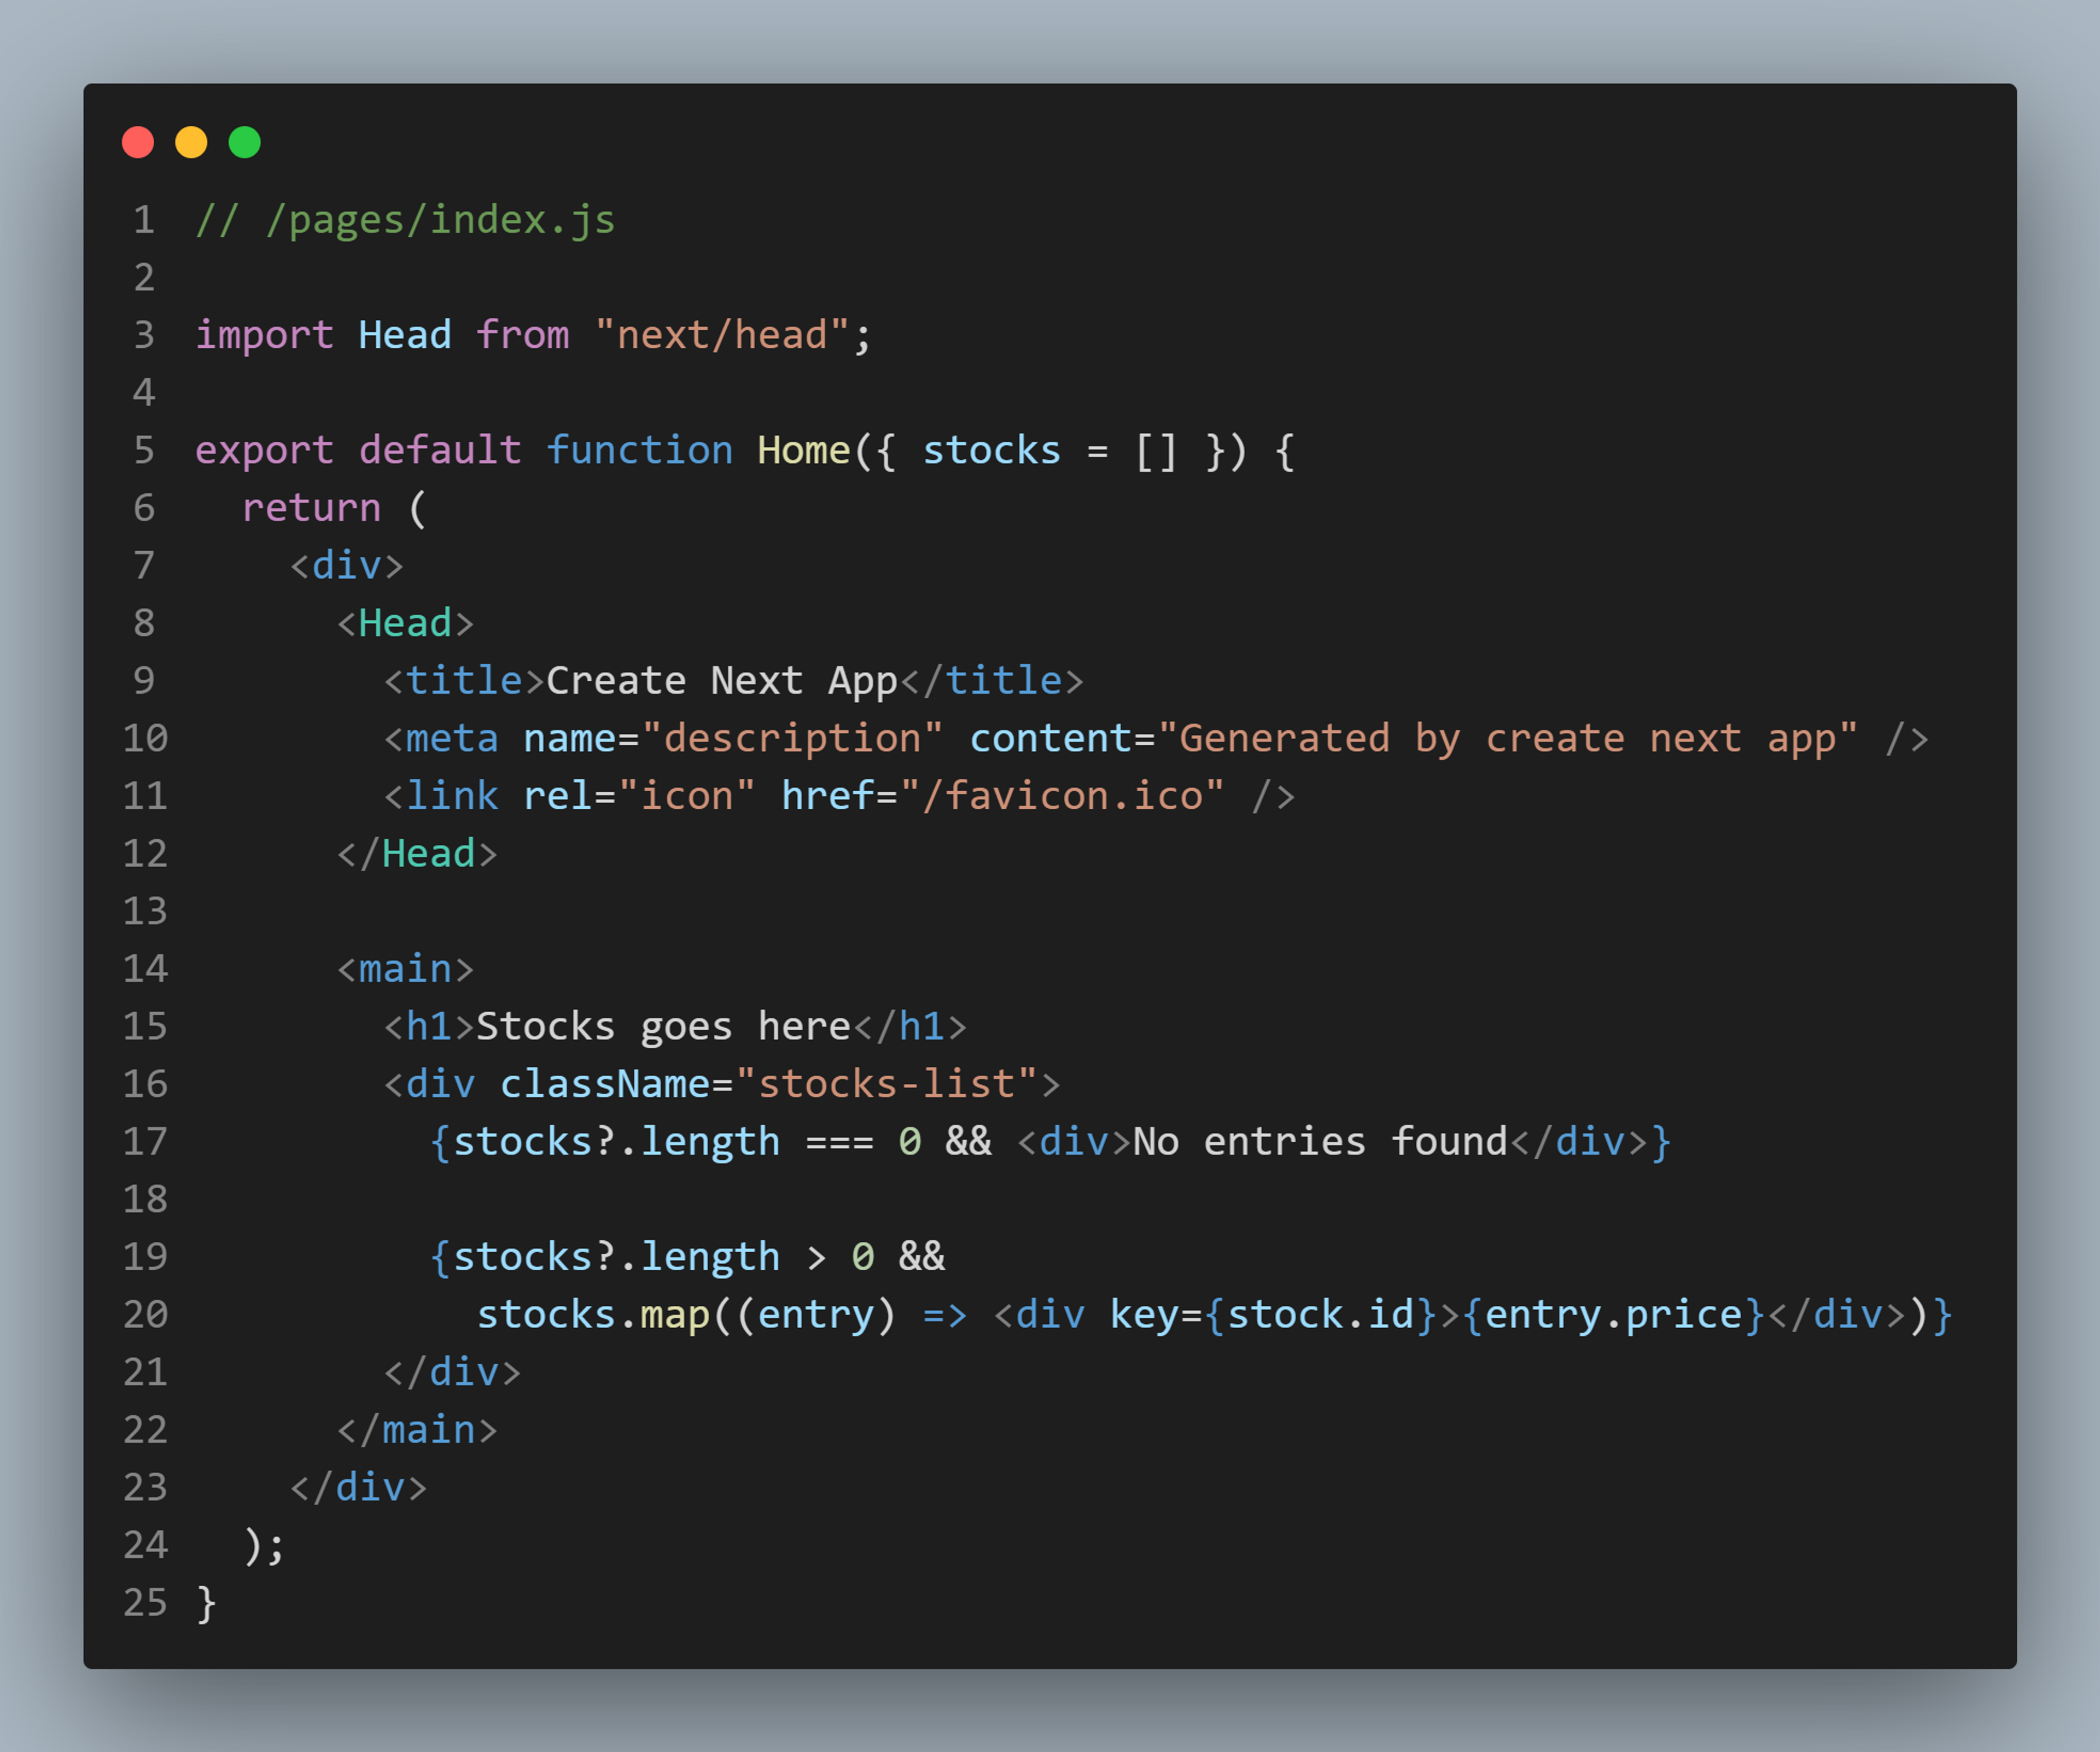
By default, Next.js pre-renders this page via the Static Site Generation(SSG) technique. If we need to enable SSR on this page, there is only one thing we need to do. I mean this is the beauty of Next.js. We enable Server Side Rendering by just exporting a special function getServerSideProps from our page.
getServerSideProps
This is a special function provided by Next.js to unlock SSR for our page. If our page is exporting this function, the server will pre-render our page prior to sending out the page to the client. This function runs on every page request received by the server. If this page is requested by a transition in our page via next/link our next/router, an API request is sent to the server which triggers getServerSideProps. Head over to this page to see the complete
Step2: Export the async function getServerSideProps from our application.
Step3: Fetch fresh data from a data source(API, database), and return an object containing props as a key.
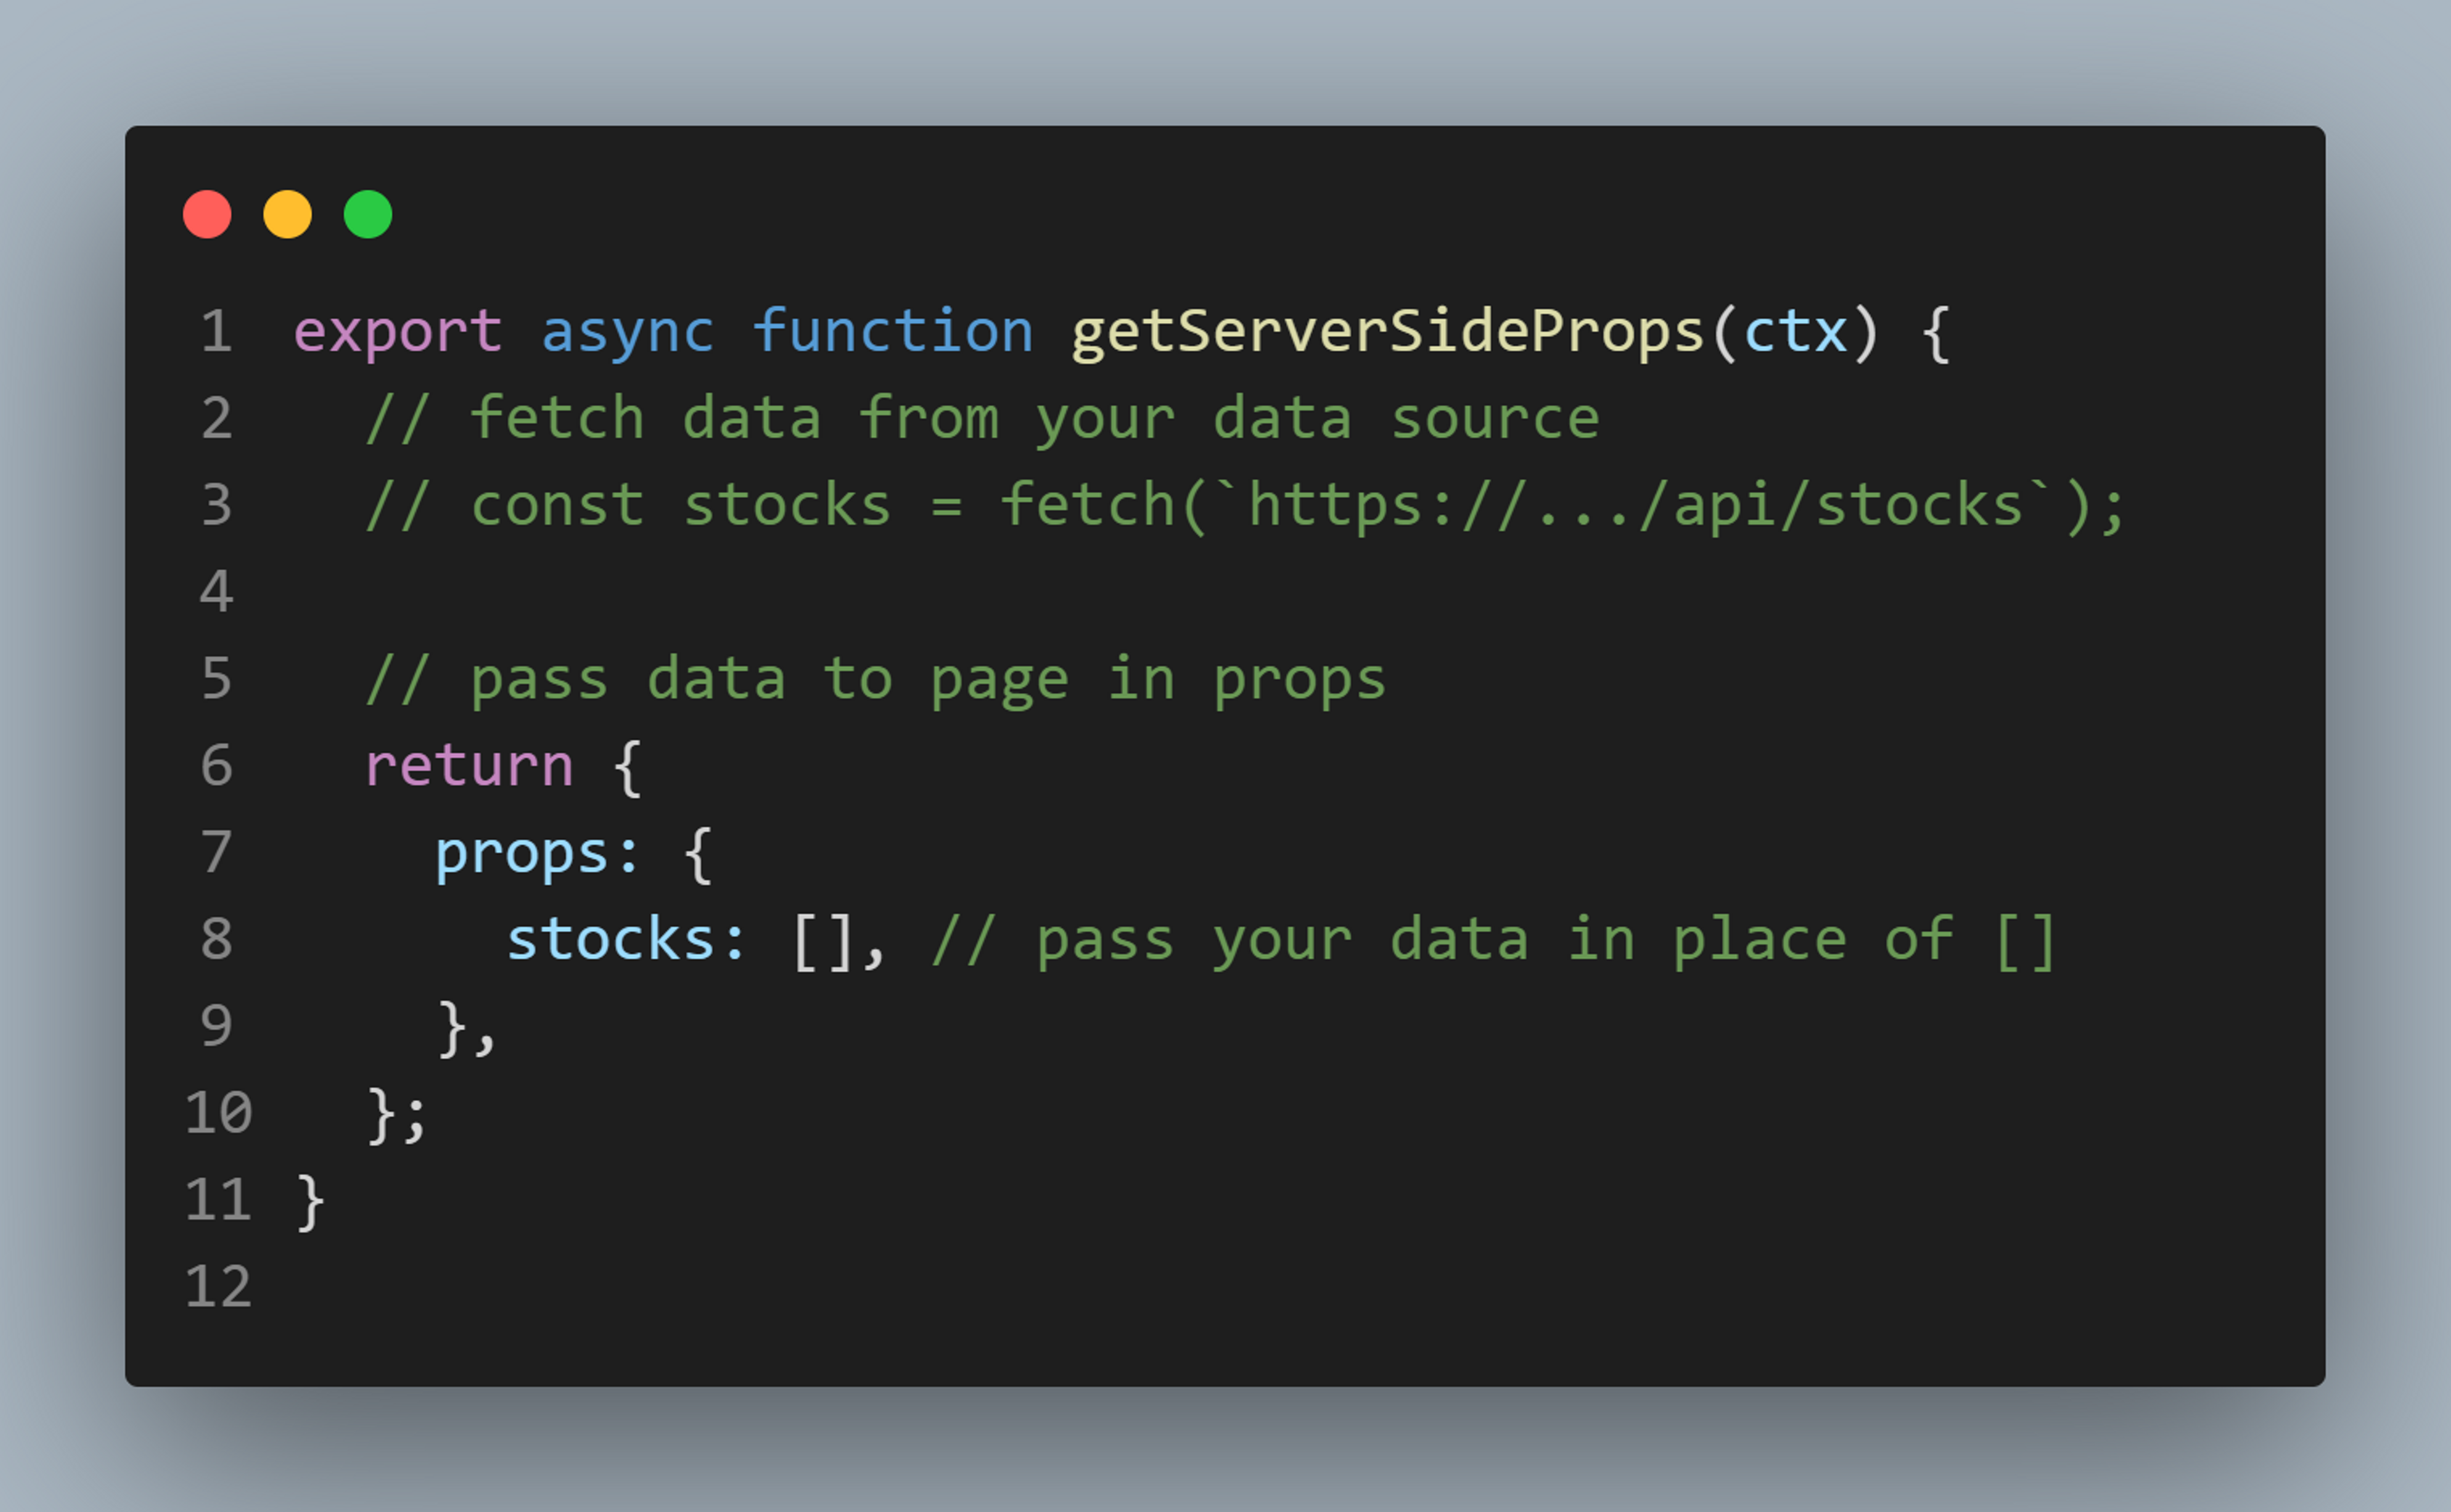
By doing these simple steps, we have implemented SSR in our application. We will now receive our data inside the props object of our page. As getServerSideProps runs, every time page is requested, we get fresh data from our data source. And every time up-to-date data is displayed on the webpage.
Static Site Generation (SSG)
The second and recommended form of pre-rendering is Static Site Generation. As evident from the name, it is the best use case for static web pages which can be built before request.
In the case of SSG, pages are built on build time when we build a site using next build on the server. These pre-built pages sit on the server and once a request is received, these pre-built pages(HTML document and minimal JavaScript associated) are sent to the browser. Once the page has been painted in the browser, JavaScript is downloaded and the page becomes interactive after hydration.
Pages built with SSG can also be cached via CDN unlike pages built using SSR. So response time is significantly low compared to SSR. Gives better performance and SEO score.
How to implement SSG in Next.js?
Well, Next.js by default pre-renders pages statically using SSG. So no extra configuration like getServerSideProps (in case of SSR) is needed if your page doesn't depend on external data. Well, we can pretty much encounter three scenarios while statically generating pages in Next.js.
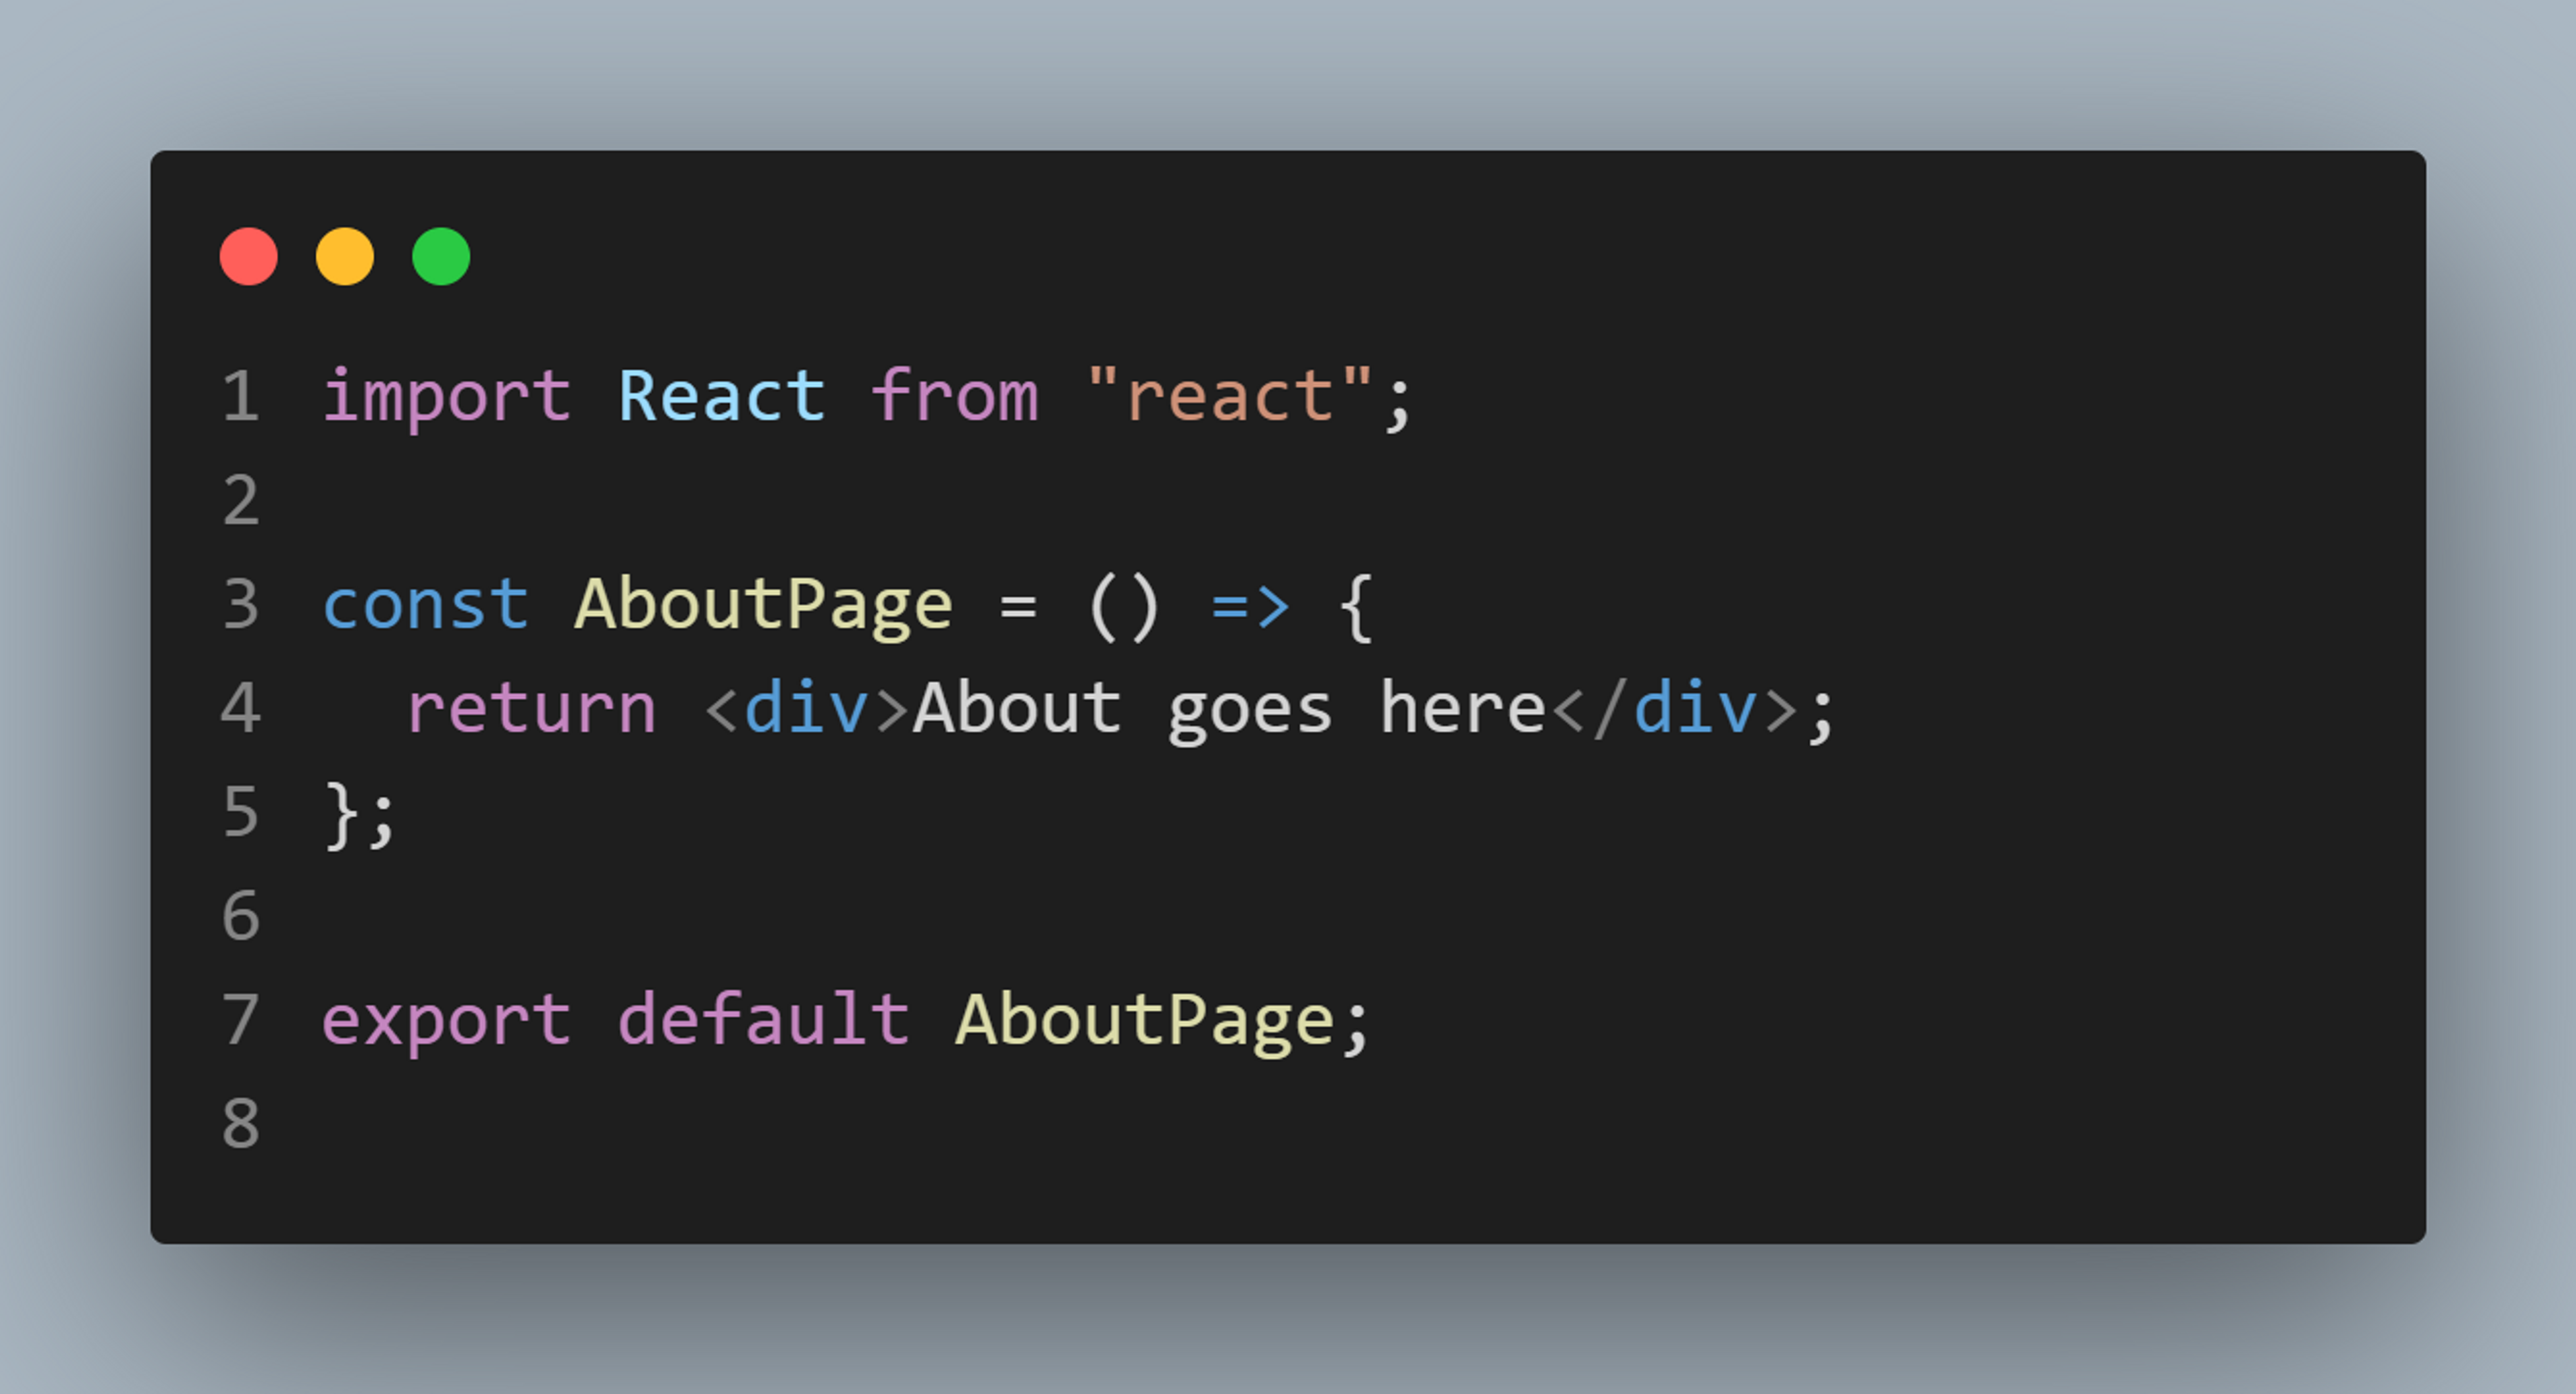
Scenario1: No need for external data while building a page on the server. If you are building some static website like a portfolio website, Guide, or Documentation site, usually(not always) you do not require any external data.
In that case, you can simply default export your React component from the page file and you are good to go. Simply like this.
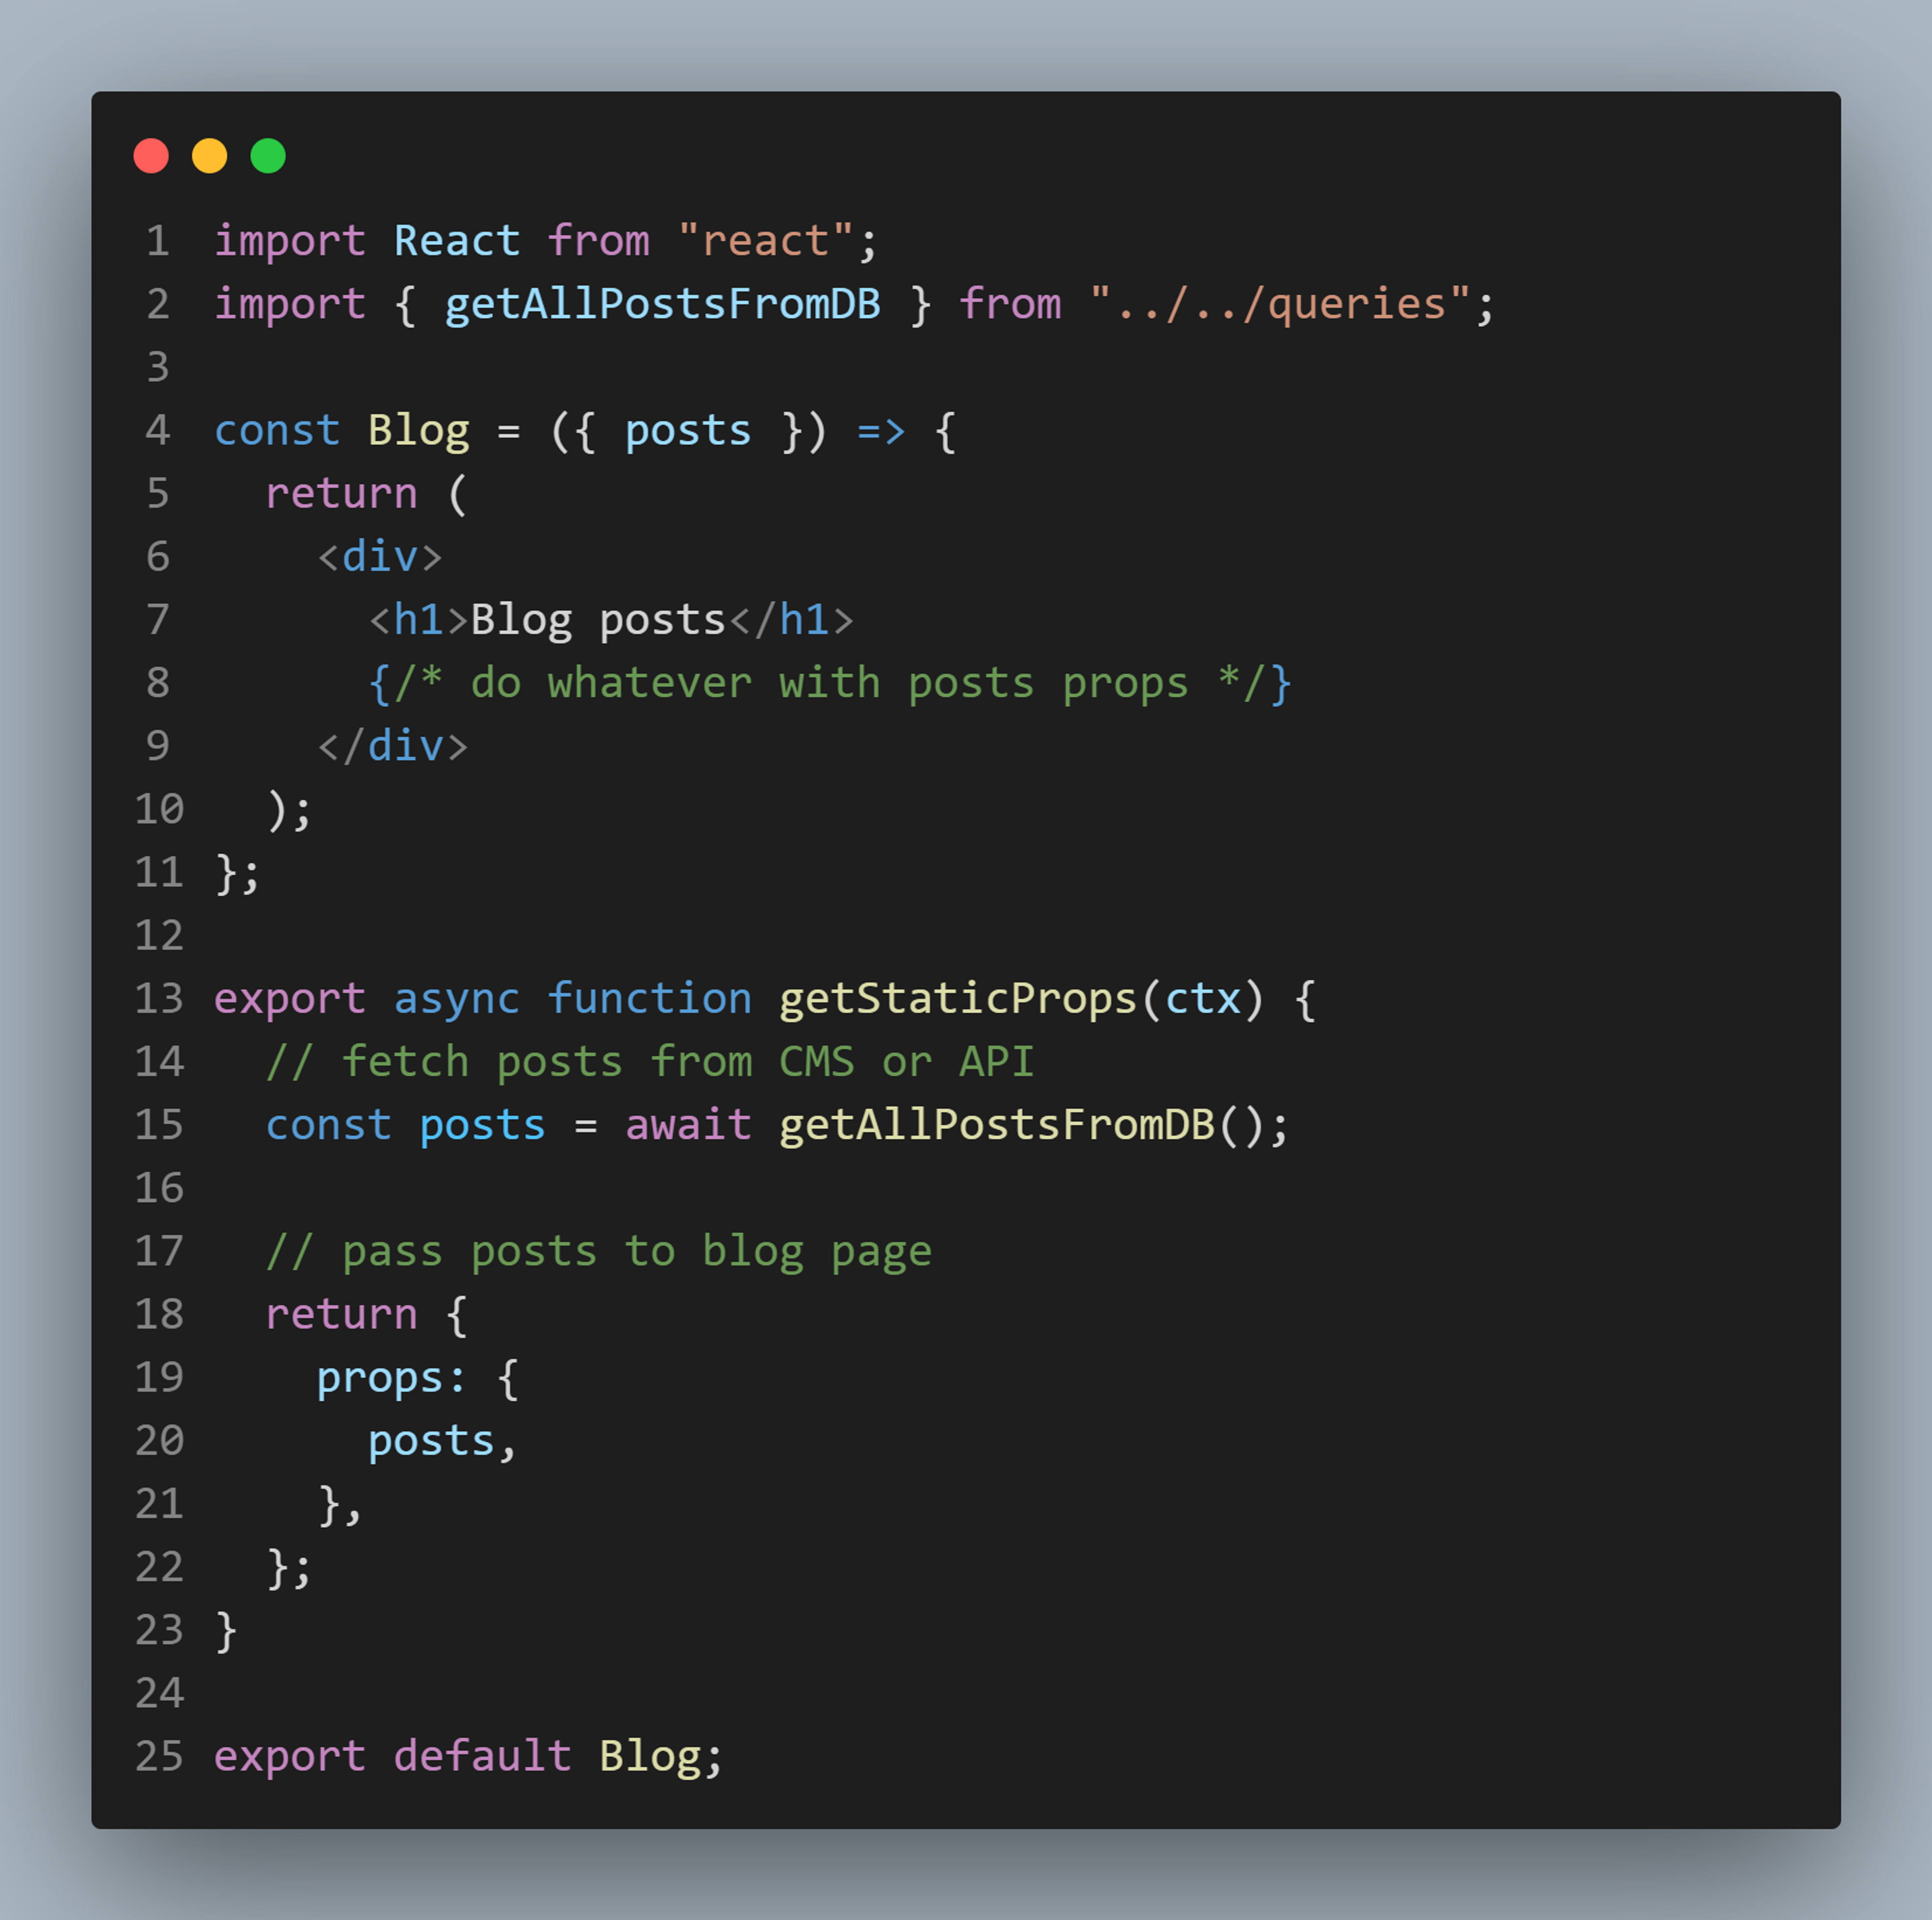
Scenario2: Your page needs some external data to be built on the server. Well, if you are building some product listing page or any page that needs data from an external source to be properly built on the server. Consider this about page, which needs to fetch team members from some database. Of course, the server cannot build a page without data being available first.
How do we handle this case? Don't worry, it's not difficult. Next.js provides us with another special function named getStaticProps. We can simply export it from our page and fetch data in it prior to pre-rendering.
getStaticProps
It is a special function, provided by Next.js to help us fetch data prior to pre-rendering. This function runs on the server, so not included in the client-side bundle. It runs before building the page and passes data to the page via props. Head over to this page to see the complete
.
Scenario3: Your page is dynamically generated, and your page also requires data from some external data source. Consider the case of a blog or e-commerce website. Where you cannot create an individual page for every blog post or product inside your page's directory. You need some more automated way to accomplish this task. Let me show you how you can handle this case in Next.js using SSG.
We are going to use something called dynamic routes in Next.js. We will move forward with a blog example.
Implementing Dynamic Route
In Next.js, we can create a dynamic route with a special syntax. We need to add /pages/blog directory, inside that we need tocreate two files; index.js for posts archive and [slug].js for individual post pages.
With syntax done, any path after localhost:3000/blog/ will be available to us for use inside [slug].js via router object. I will show you in a while. I will show you in a while. You can learn more about dynamic routes over
Fetching data for a specific post using slug parameter
I believe you have already guessed it. We will simply export getStaticProps from our file. But this time, the requirements are a bit different. Last time we knew what exactly to get from the data source.
This time, it's a dynamic route. Actually, we need to fetch data from the server based on a slug. Like in this case /blog/post-1 we need to fetch post with slug=post-1 and in case of /blog/some-other-post-slug out slug would be different. some-other-post-slug exactly.
Next.js makes our work a bit easy and provides us what is the slug of the requested page inside getStaticProps.

Add getStaticProps to fetch specific post by slug;
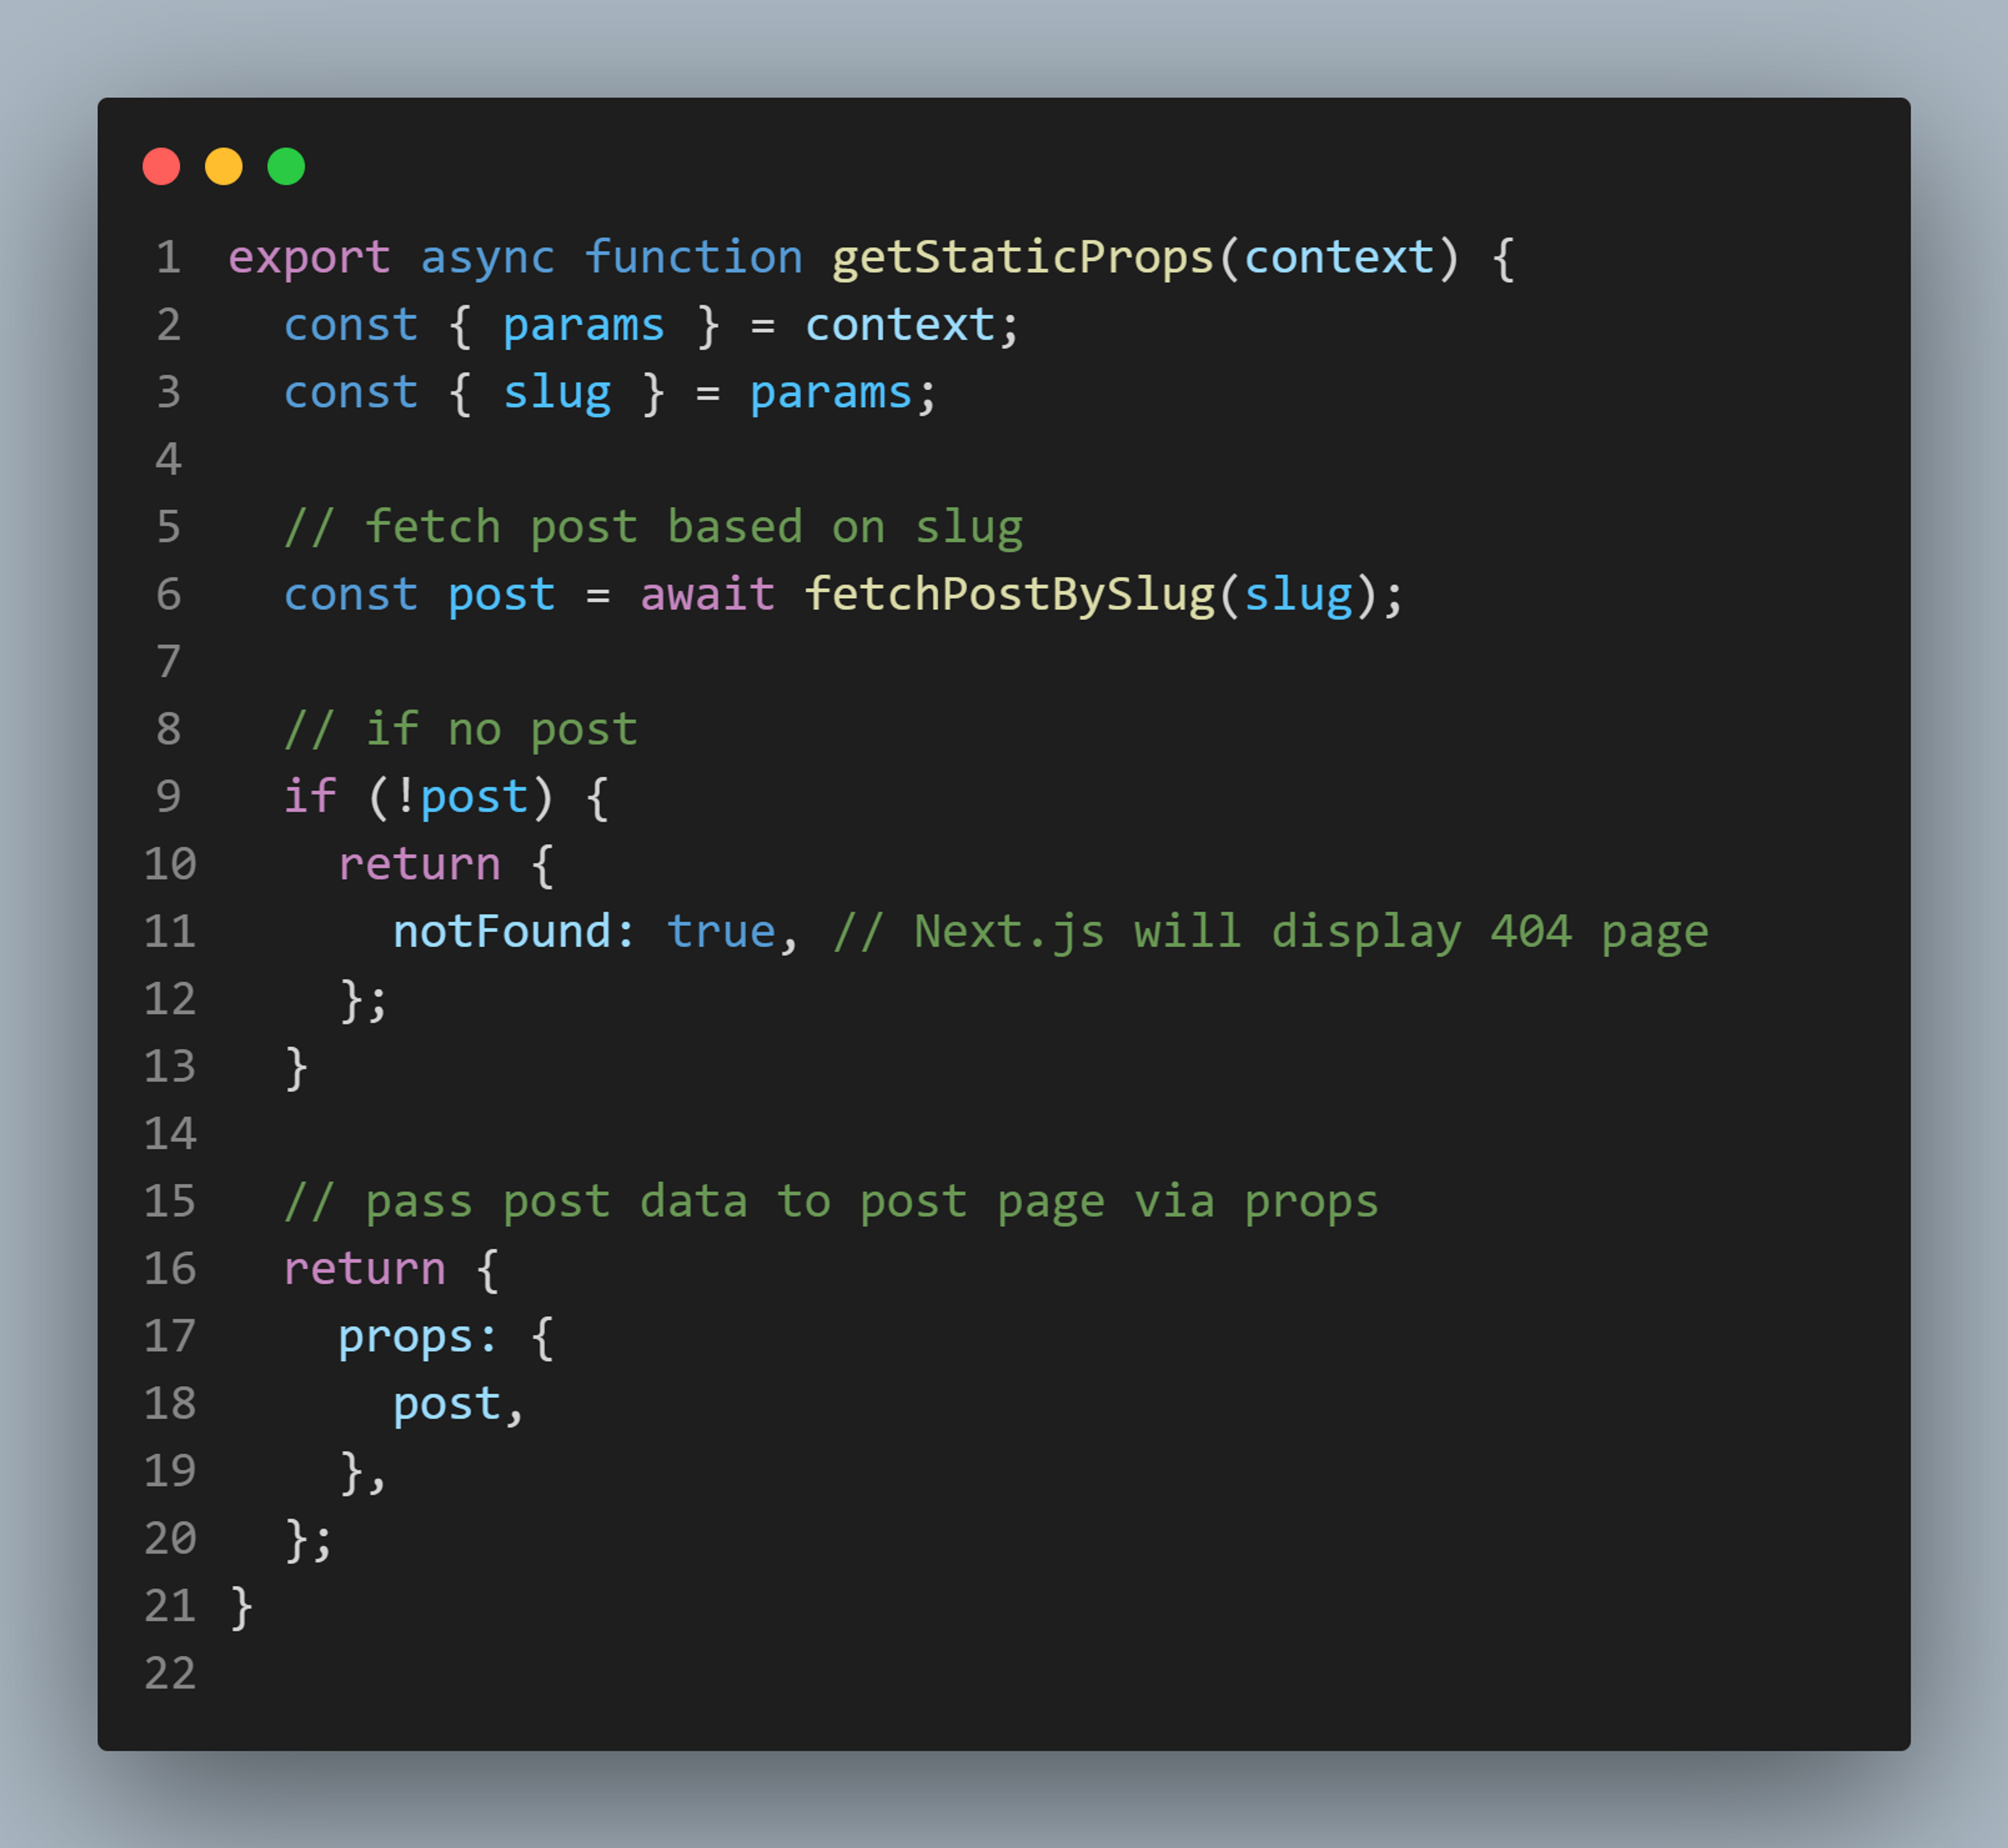
Once a post has been fetched we are passing that data to the PostPage component as props. We are checking if the post is not defined, and we are returning a notFound=true This will ensure a 404 page appears if the post was not there.
Well, you might be thinking, that's it like previous cases. But it is not the case this time. Because we are pre-rendering blog posts dynamically. Now think about it, how would Next.js know which blog posts to pre-render? There could be many blog posts and we want to pre-render all of them. The answer is we need to tell Next.js that, these are the routes(slugs), that needed to be pre-rendered.
What Next.js would do is, just run getStaticProps props for every slug we will provide. It will fetch data from the data source and pre-renders page for us. Now the question is how do we tell Next.js, which routes to pre-render?
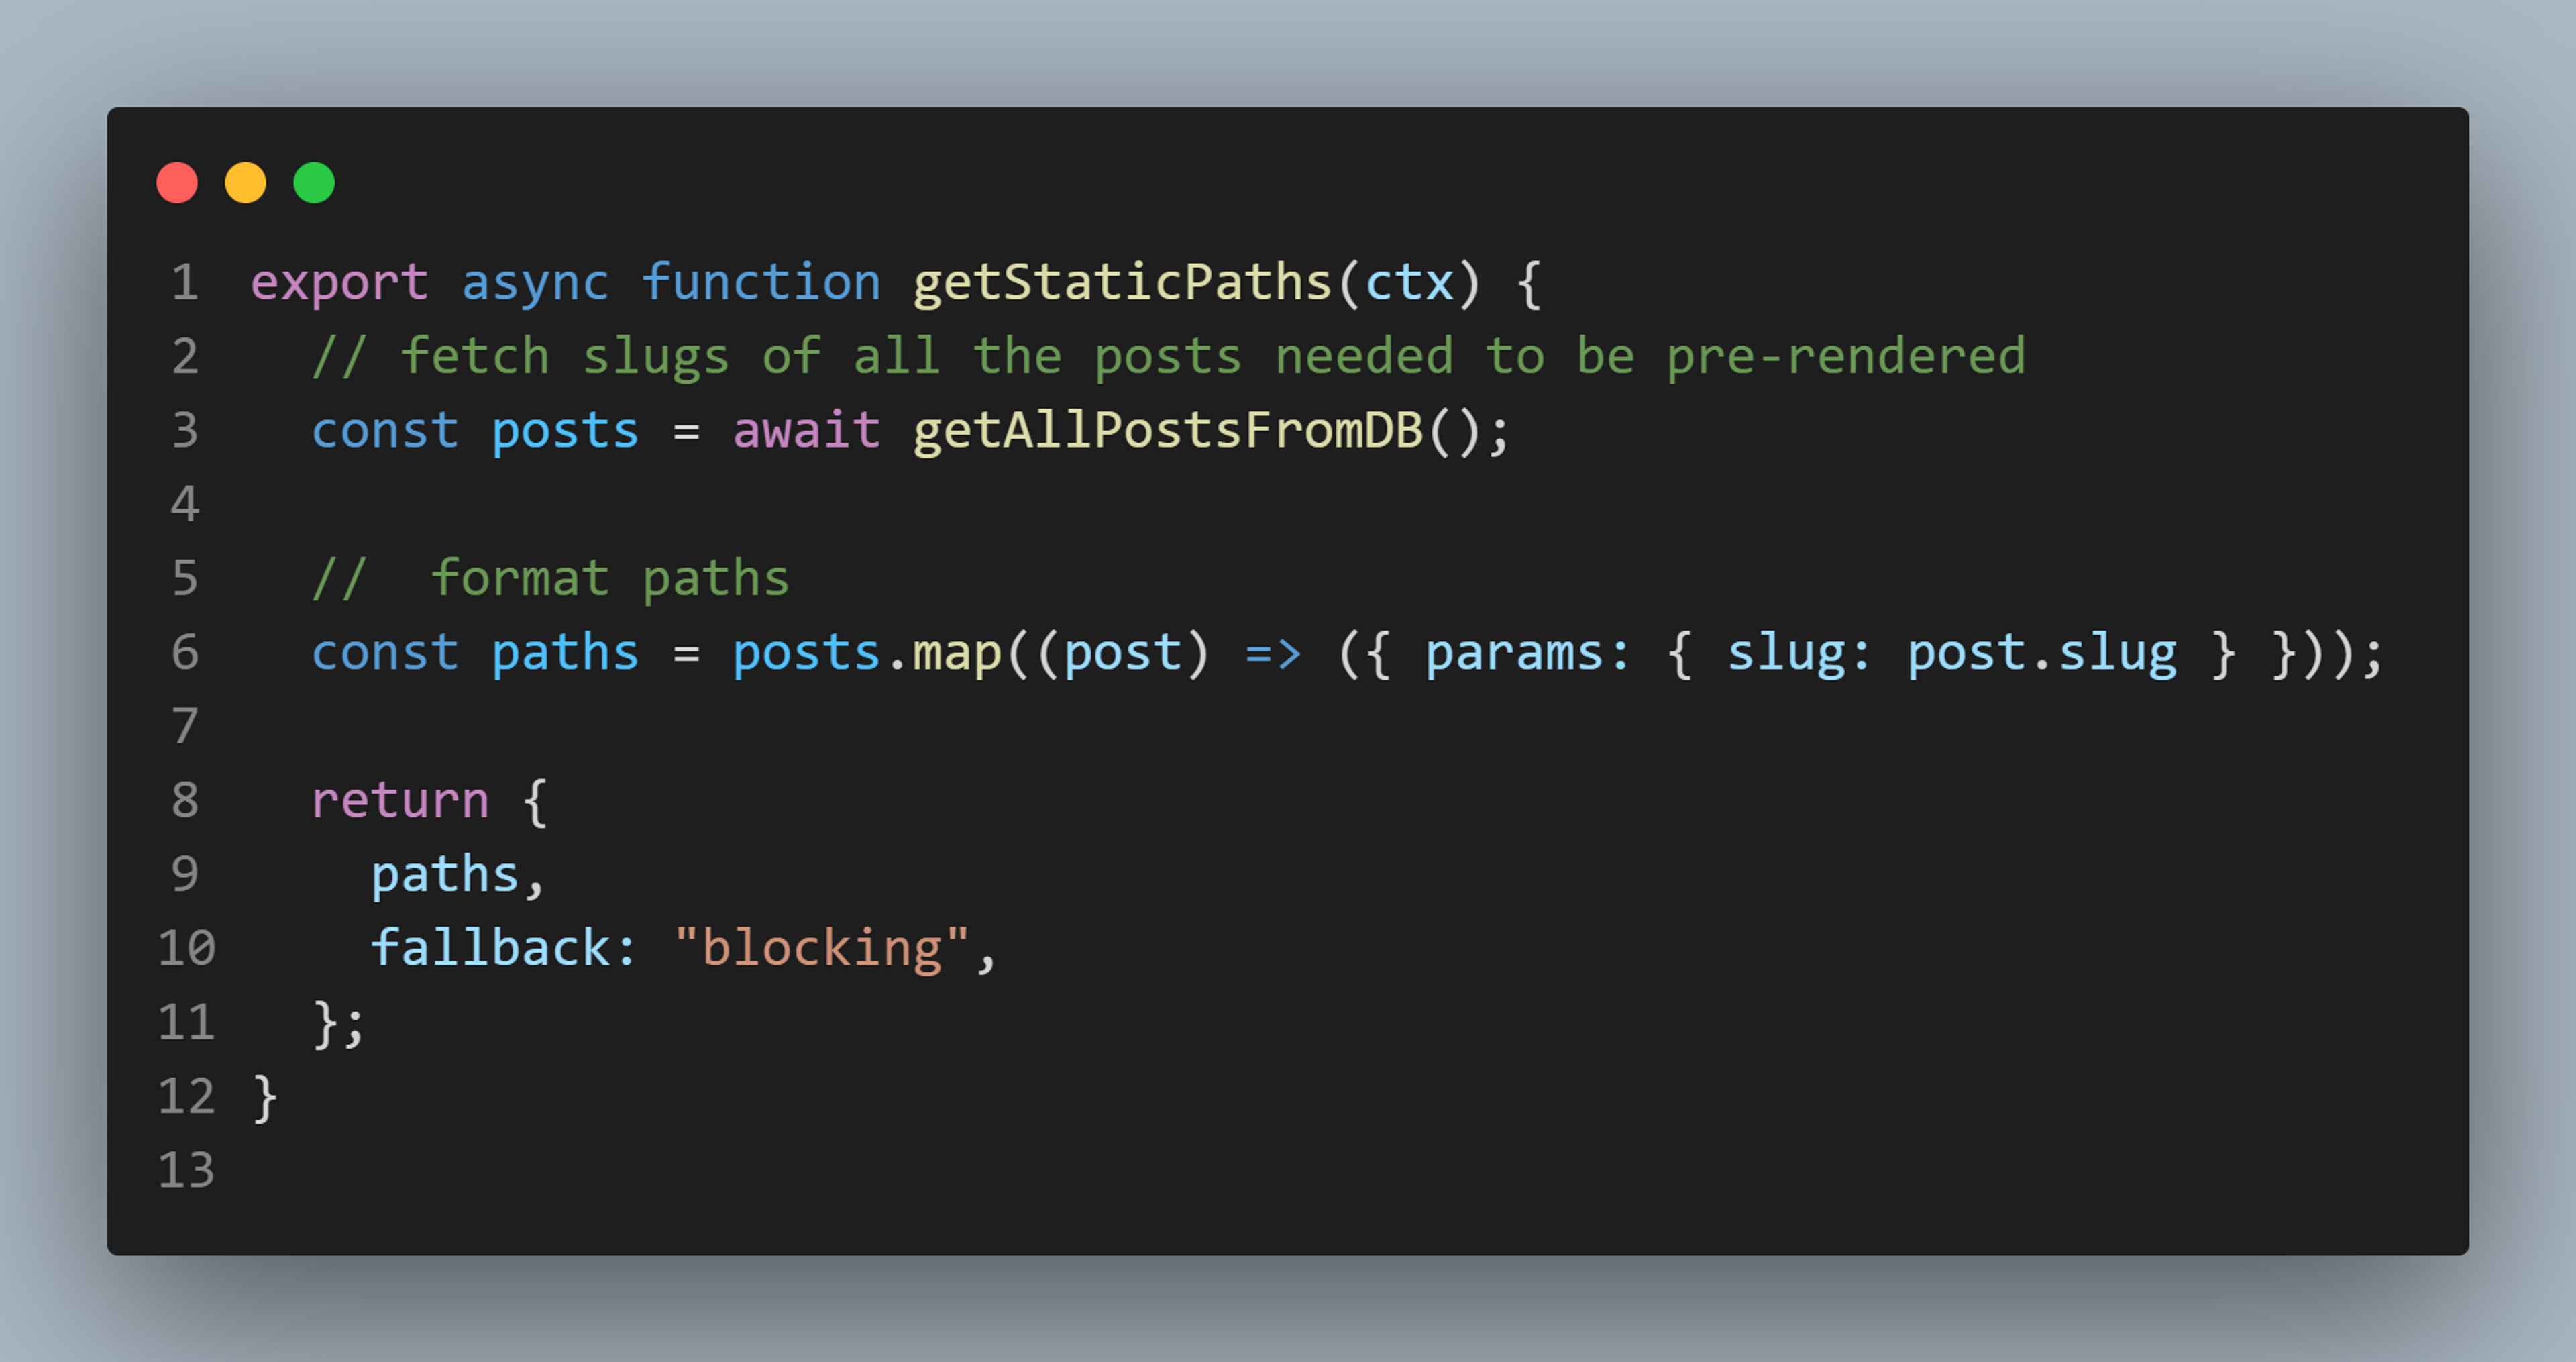
This is very simple, as Next.js provides us with another special function called getStaticPaths that we need to export from the dynamic route page [slug].js.
getStaticPaths
getStaticPaths is a special function provided by Next.js. It runs on the server only, so addition to the client bundle. This function runs only once on the server to supply Next.js with the list of paths that need to be pre-rendered. Head over to this page to see the complete
Simply export the async function getStaticPaths from our file. Now logic from here may with your use case. But let me tell you, what you have to do actually.
Step1: Fetch all posts of just slugs(if query filtering is available in your use case)
Step2: Format slugs or posts to a specific pattern. Where paths is an array of objects, each object containing single key named params, with an object as the value. This object contains the key named after the query parameter you used in the dynamic route file name. In my case, it is slug.
See the below example.
If you followed along, you have successfully implemented Static Site Generation in case of dynamic routes using getStaticProps and getStaticPaths.
Caveats in Static Site Generation(SSG)
So far we know that pages generated using the SSG technique give us better performance and high SEO scores. Also, pages built with SSG can be cached via CDN so users can get responses even faster. These are all the plus points of SSG. But there is a catch here.
We know that pages are built at build time in SSG. But what if a user is accessing the page after several months? What if data on the CMS has changed? Admin has made some updates. What data would be displayed on our page? Same outdated data, right?
This behavior is not needed in a few cases, where data gets updated more often. How Next.js handles this case scenario. Well, I am going to introduce Incremental Static Regeneration(ISR) to you. I have recently built my personal blog using Next.js. And it is also using Incremental Static Regeneration.
Incremental Static Regeneration(ISR)
ISR is an awesome technique introduced by Next.js to tackle stale or outdated pages problems in Static Site Generation. It is not another kind of pre-rendering technique but an extension of SSG actually.
You need to know what we are actually trying to solve here. We want our webpage to show updated content when we update data in the backend. When data you updated data in the backend, probably CMS, then you have 3 ways to update content on the Frontend (Next.js).
Method1(NOT RECOMMENDED): You can re-build your entire application(excluding cache) again when you need your page or pages to show updated data.
Method2: You can use periodic ISR (I named it myself 😍).
Method3: Or you can use on-demand ISR.
We will discuss both of these. Let's start with periodic ISR.
Periodic Incremental Static Regeneration
This type of ISR automatically rebuilds our page(not the entire application) after a specified time period, when a request comes after that specified period.
Let me explain. When users land on the page, a counter starts. Our user is seeing our cached version of the webpage. So performance factor is not affected. Our user gets the same page that a user would get if ISR is not implemented.
When a counter hits our specified time, a request is sent to the server to rebuild the page. Everything is happening behind the scenes, in the background. Any request after our specified time, Next.js serves the newly built page. And this freshly prepared page is cached again. Again the cycle begins.
Let me show you periodic ISR in action;
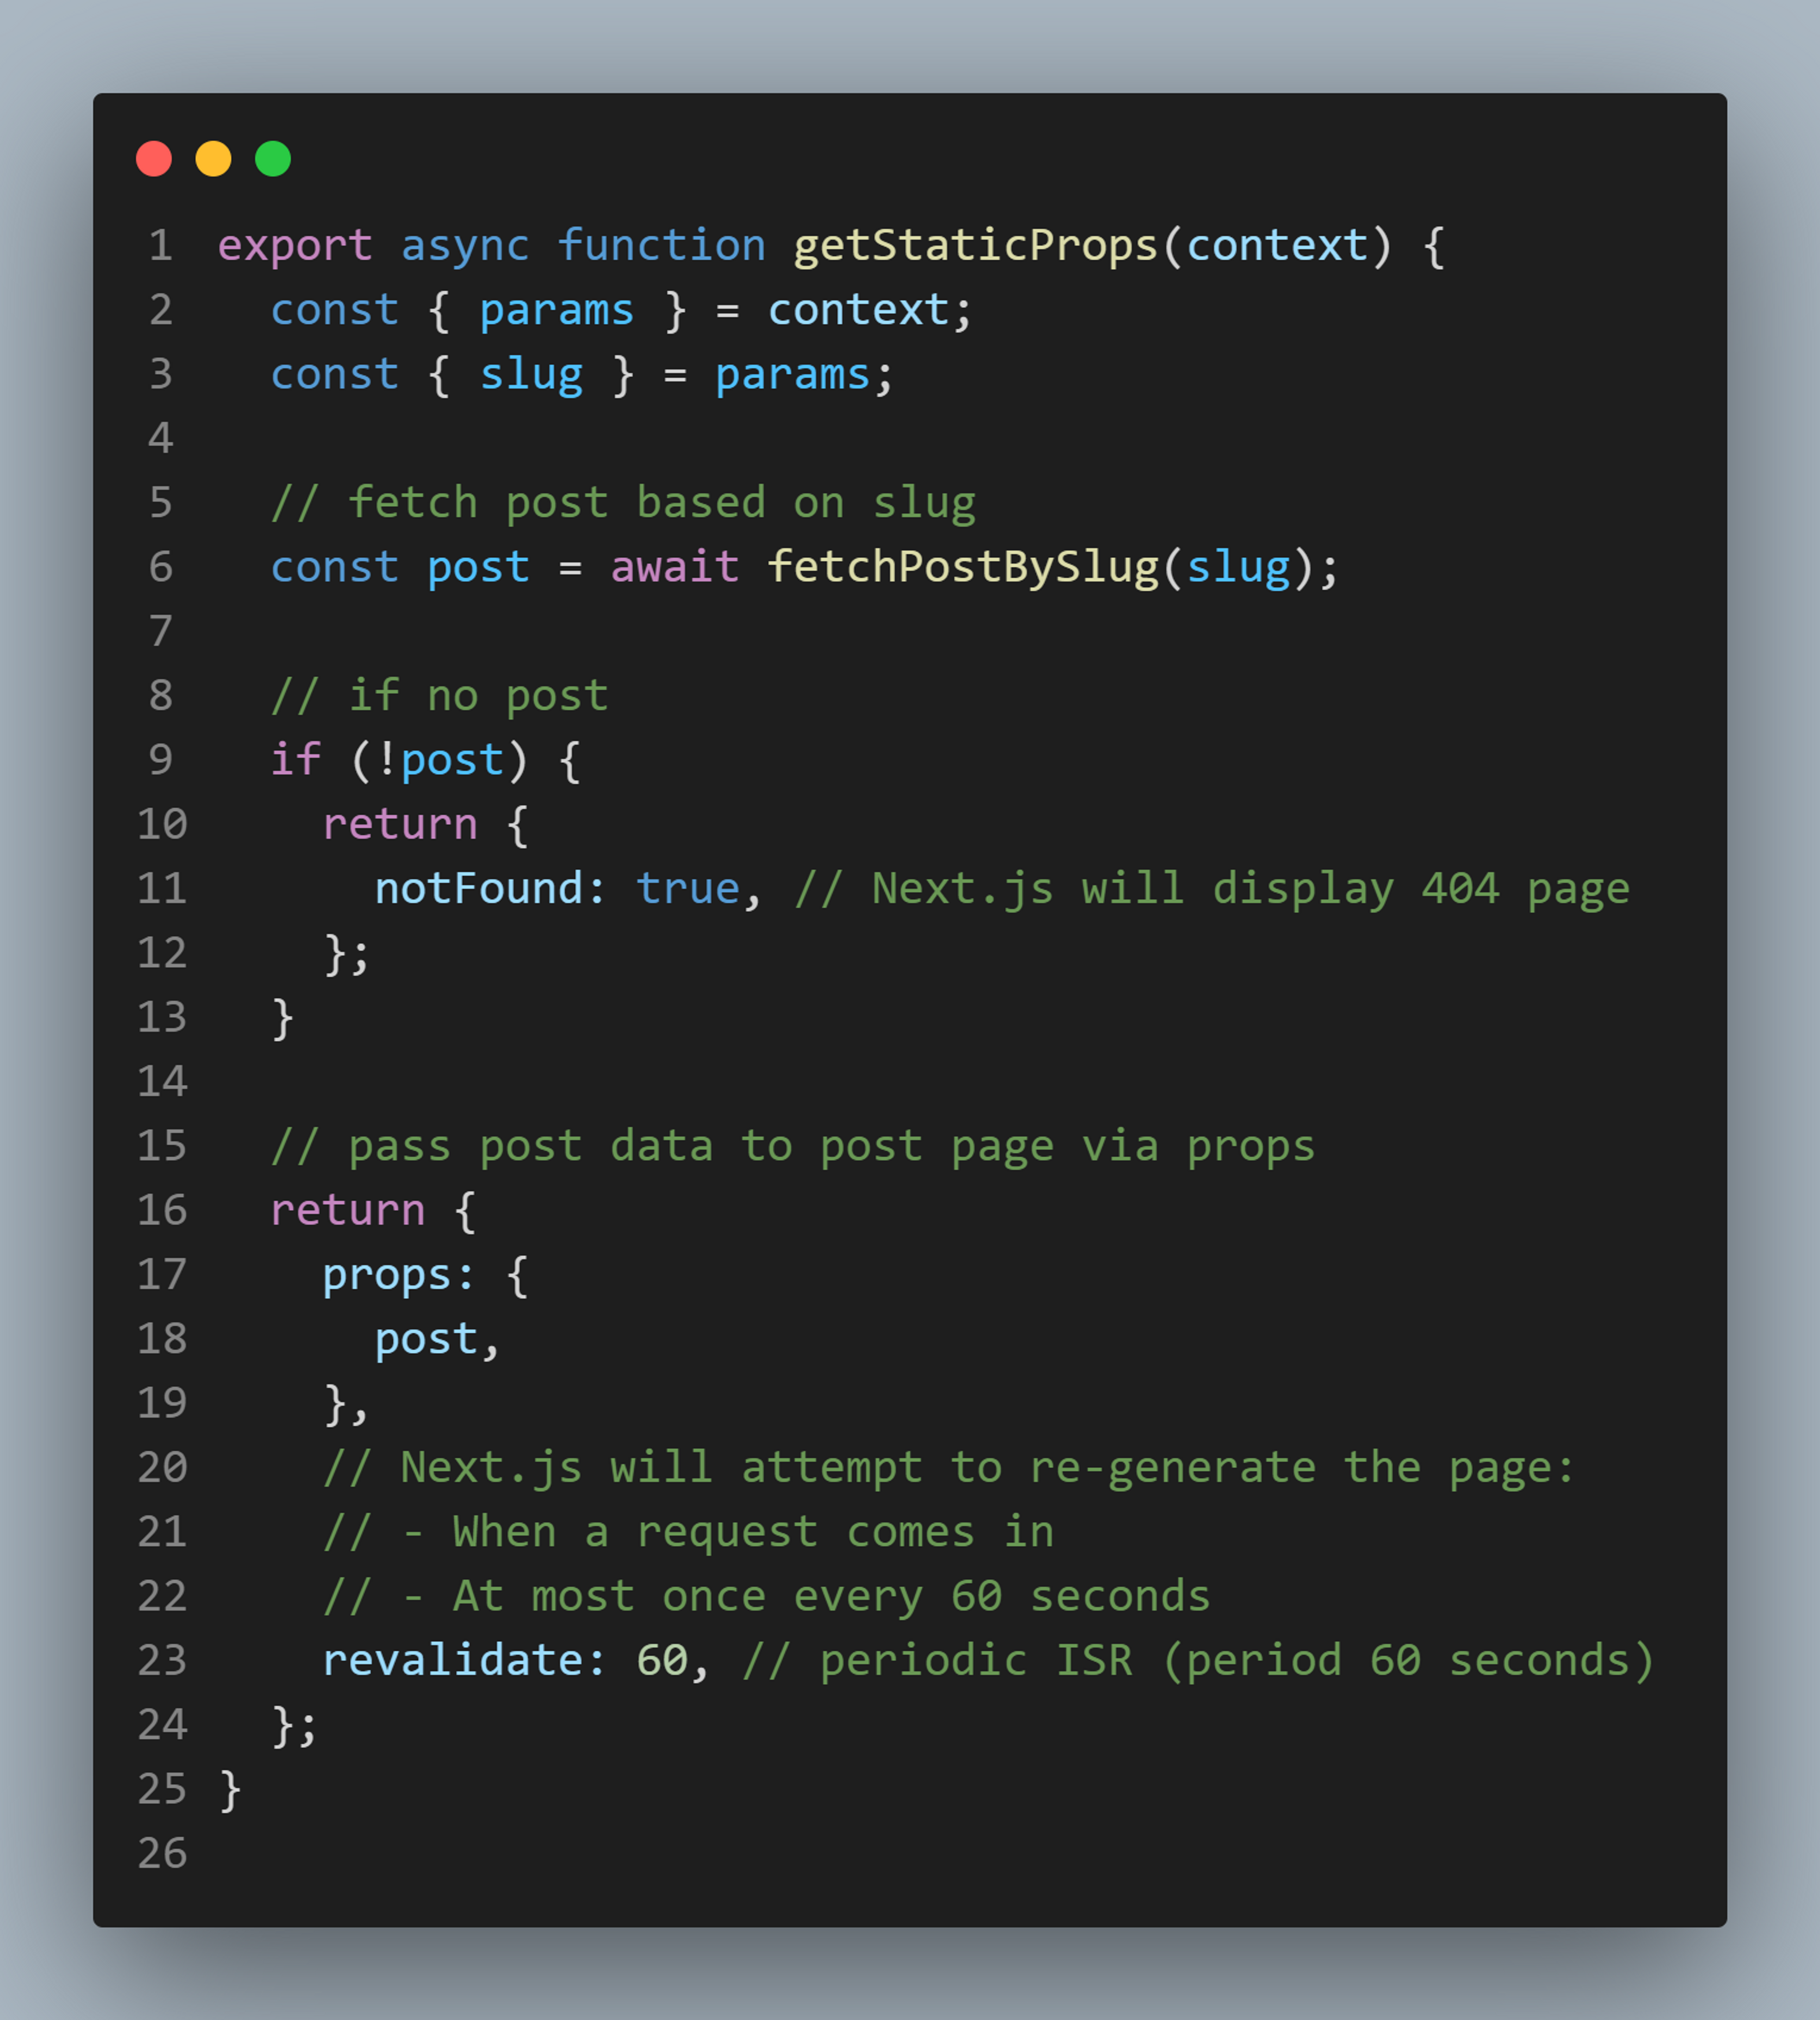
You just need to add revalidate prop inside the getStaticProps function of your [slug].js file. Next.js will try to revalidate(rebuild) our app when a request comes in after 60 seconds.
Mean, for the first minute out user will see, the same cached version of our page and any request coming after one minute window will trigger revalidation on the server. Next.js will rebuild the page in the background. If a page was built successfully, Next.js will invalidate the cache and show an updated page afterward.
[NOTE: 60seconds is too aggressive. Your server resources will be under fire when it needs to rebuild your page every minute(at most), Either you should use on-demand ISR or keep time as high as possible.]
On-demand Incremental Static Regeneration
I personally like this type of ISR, because you have kinda more control over revalidation. You decide when you want to revalidate your page. Your server resources are safe. This also minimizes the period, when users need to see outdated pages.
To implement on-demand Incremental Static Generation, we simply need to create an API route, which we can later call to revalidate particular paths.
I hope you already know how to create API routes in Next.js. But if not, I will explain in a beginner-friendly manner. Or you can simply head over to this
to have a sneak peek.Implementing revalidate API route
We do not need to provide extra revalidate prop inside getStaticProps. So make sure to remove what (revalidate: 60) we added in the previous example.
Let's create our API route. Add file inside the /pages/api directory. In Next.js file added inside the /pages/api directory is mapped as an API route, and can be accessed at localhost:3000/api/some-route.
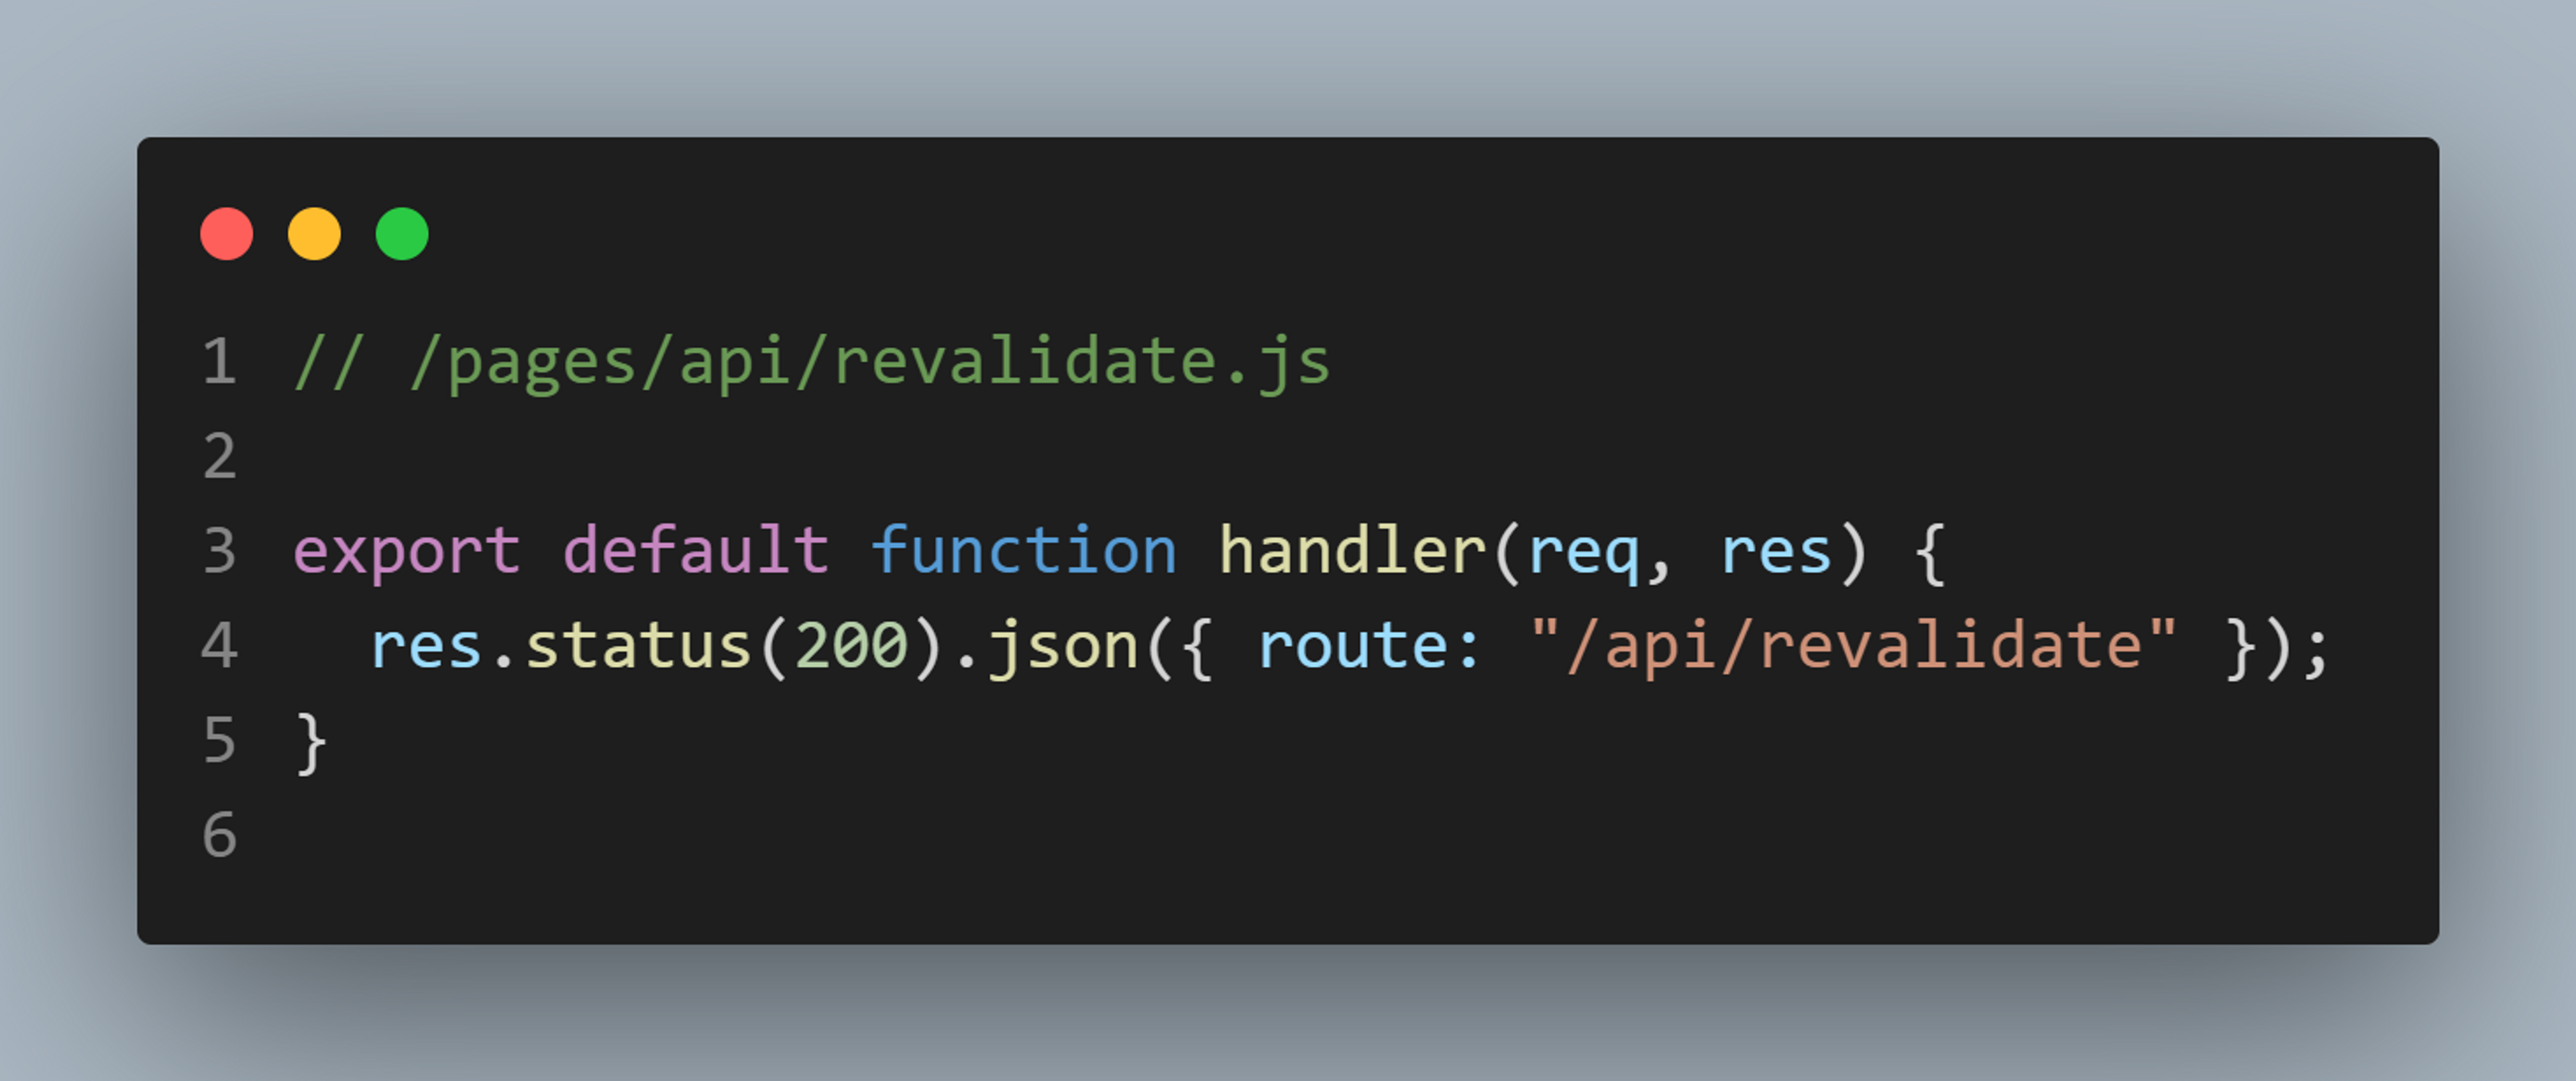
We have added a basic handle for our route. You can test this by running running localhost:3000/api/revalidate. You should get a JSON response back.
Let's configure our handler to revalidate our page.

Step1: Grab the token and route from our request. While trying to revalidate, we would need to provide the route we want to revalidate and a secret token(prevent unauthorized requests) inside the request URL.
Our sample request look will look like this;
In production
GET https://<your-site.com>/api/revalidate?secret=<token>&route=<route>
In Development
GET http://localhost:3000/api/revalidate?secret=<token>&route=<route>
So first thing first, let's add our secret token inside the .env.local file. This is the place where we can store our environment variables in Next.js.
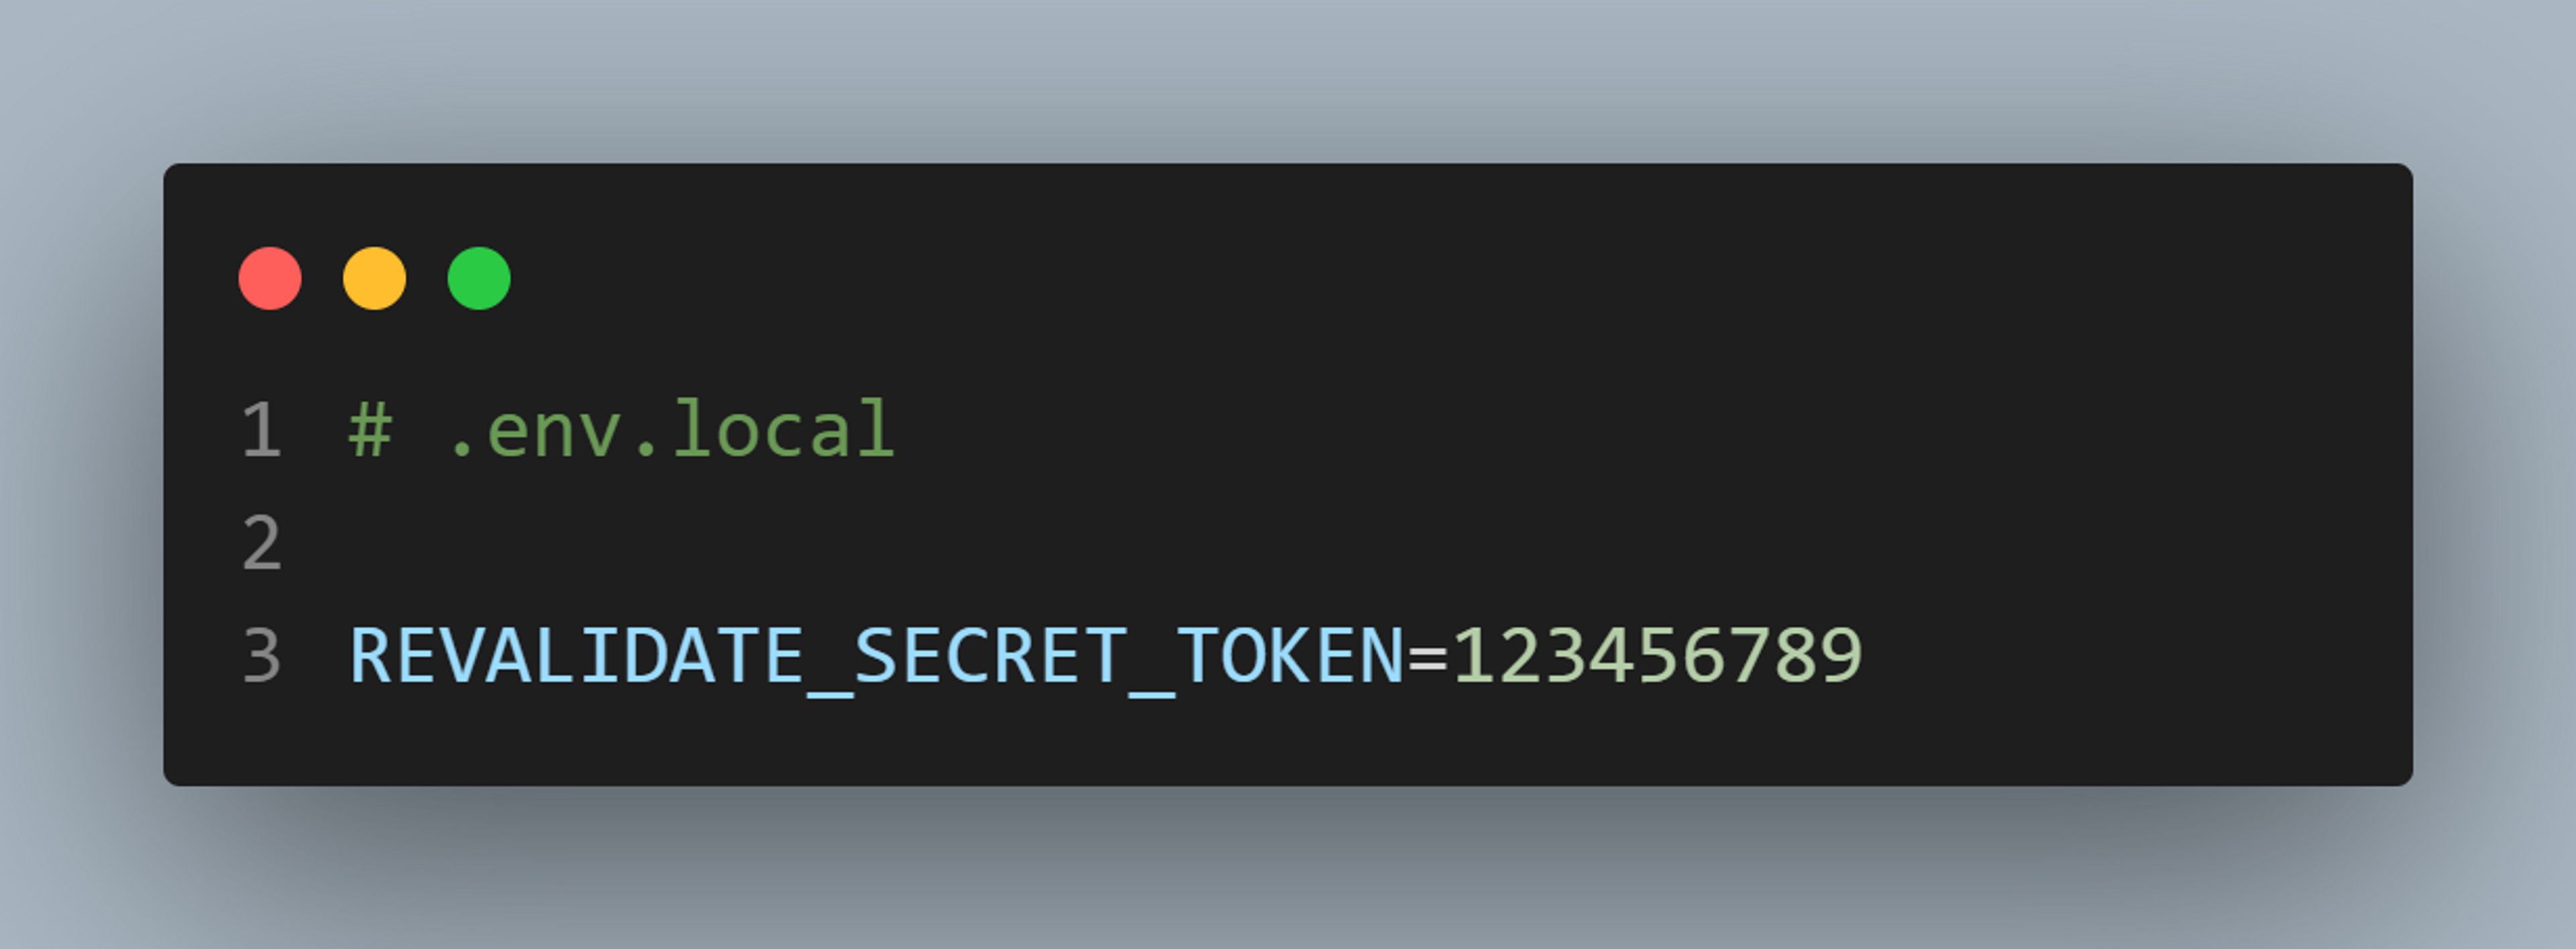
Kill and restart your development server. You should be able to see environment variables loaded message in the console.
Step2: Secondly we need to do certain checks. First of all, if a token is not defined or the token inside the request and the one inside .env.local does not match. Return server error with status code 401.
Secondly, if the route is not defined, we need to return the very same response but with a different message.
Step3: Inside try catch block, we try to invalidate our route by calling res.revalidate(route) method. And once it is done we return a successful response. If any exception(error) occurs, we catch it and return an error response with a status code of 500.
That is it for revalidate API handler. Now our API route should be working fine. Time to test it out.
Testing
Open your browser and enter make a request to the following endpoint;
http://localhost:3000/api/revalidate?secret=<token>&route=<route>
Replace <token> with your own secret token inside .env.local and replace <route> with your slug prefixing with /blog/.
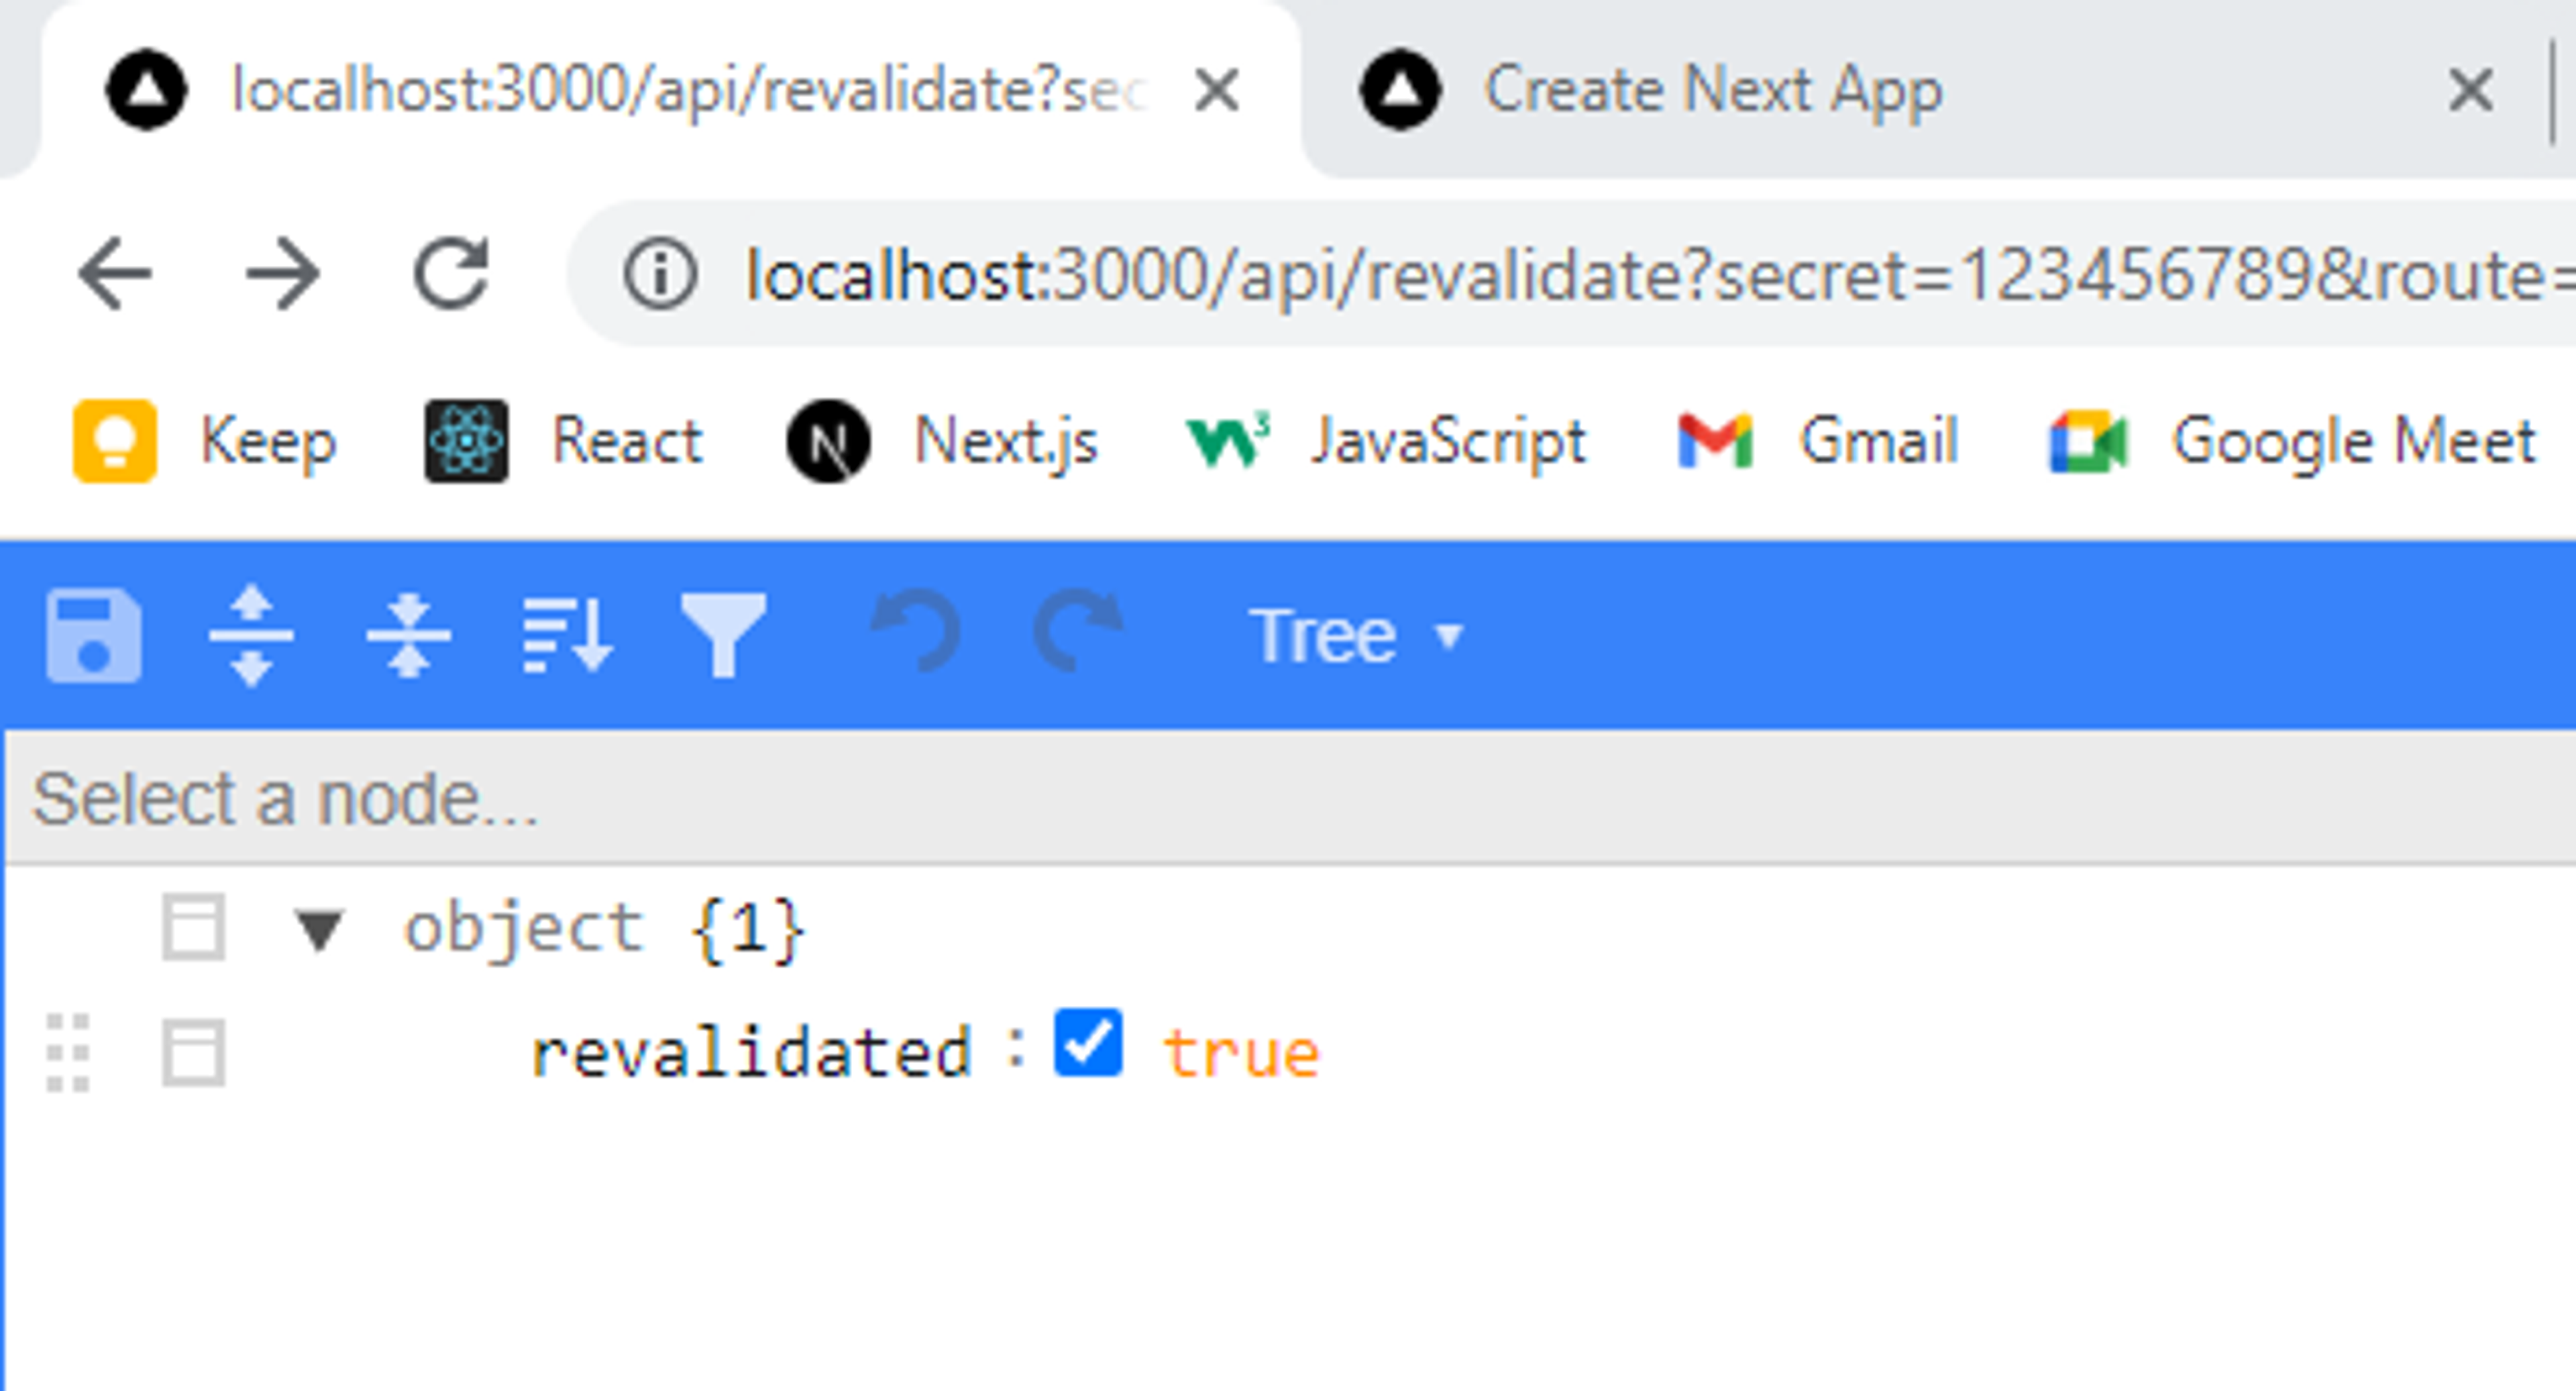
For instance, if you want to revalidate /post-1 and your token is 123456789. Then your request should look like this.
http://localhost:3000/api/revalidate?secret=123456789&route=/blog/post-1
If you get success response, with revalidated=true . You have successfully revalidated your page.
Conclusions
In this guide we have learned;
- What is Client Side Rendering and how does React.js use it?
- Why do we need to use Next.js instead of React.js in production?
- What is pre-rendering and how does Next.js handles pre-rendering our pages?
- How many kinds of pre-rendering are supported in Next.js?
- How to unlock Server Side Render your pages in Next.js on every request(SSR)?
- How to statically generate web pages in Next.js at build time(SSG)?
- How to solve stale data problems in pages build with SSG using Incremental Static Regeneration?
- How to periodically revalidate your pages, and how to implement on-demand Incremental Static Regeneration?
Wrapping Up
Hopefully, you liked this guide, and let me know if something was confusing in this entire guide. If you find some mistake, please let me know. I would love to make the correction for future readers.
I regularly post guides like this revolving around the MERN stack. If that is your field of interest and want to read other guides like this, do follow me.
See ya soon. Till then stay safe and try to keep others safe. ❤️